
- June 29th, 2014, 3:30 pm#4799436
Hey everyone, thought I would show my progress so far with my gigameter build. I've been very excited to start this as the gigameter has remained for a long time one of my holy grail props. It looks superb in the film yet finding a scrub n' buffer to work from is nigh on impossible. I was lucky to acquire a cast of a shell from Kingpin, I believe it's an AZ spidey cast from a few years back. Cyland props has been a constant source of research on this build as there is so little information available on the build techniques and above all the electronics. There's been a lot of guess work so far and I imagine there will continue to be. I've drawn some rough sketches to get my ideas down on how exactly to get everything working as close to as seen on screen as I can manage.
Anyway, enough waffle, on with the build!
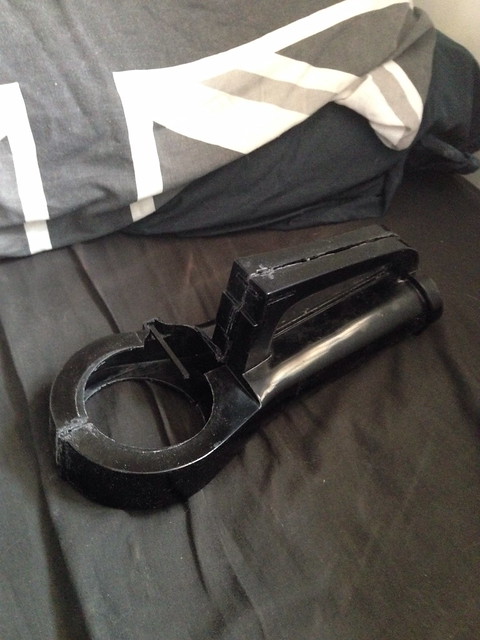
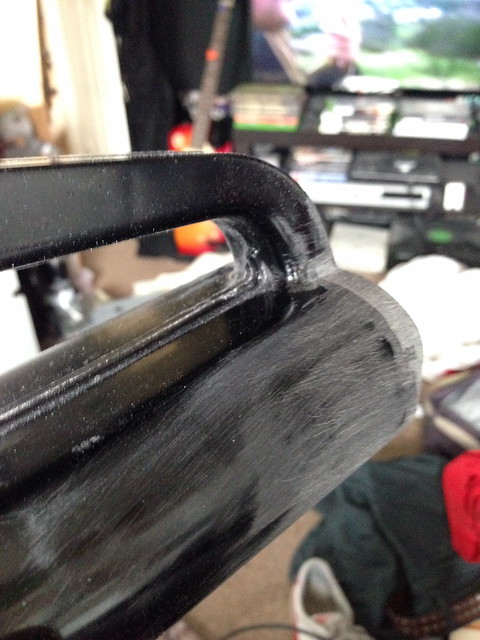
Here's the shell as it arrived, aint it pretty? The first thing I did was to get rid of all the mould struts on the inside. Next, I dremeled off the motor hump and using a piece of styrene, cut a piece to fit in the top part to match the other side. I used milliputt to fit the piece and then sanded it smooth to match the left piece
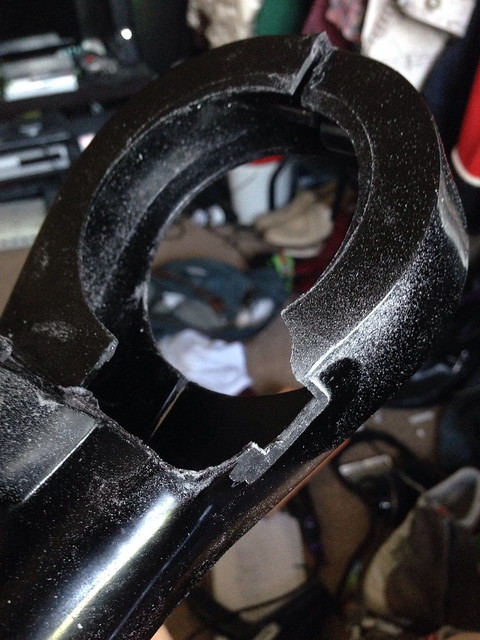
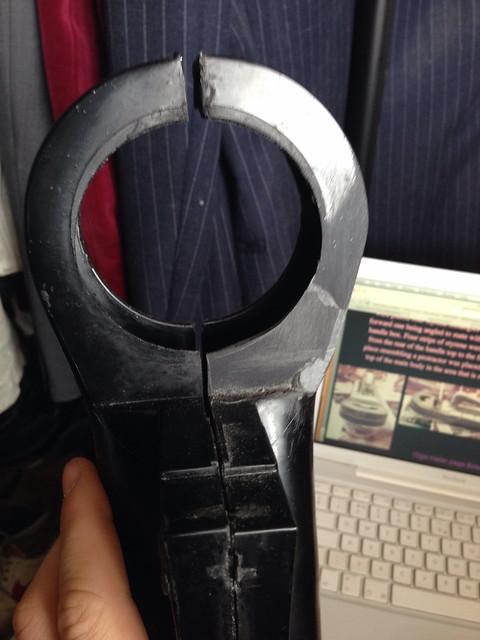
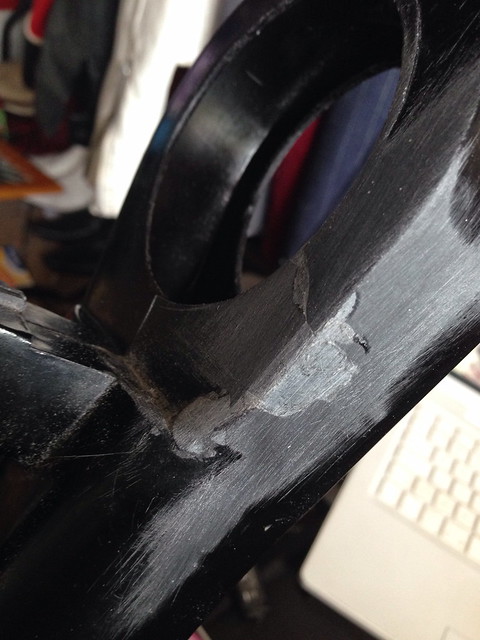
I then glued the two halves together using some strong plastic glue. I filled the inside of the handle with more milliputt which came in handy when I started to round the front of it. I also filled the rear flange of the body in preparation to sand that smooth too so it was more in line with the body.

Next came the bit that I was dreading the most, cutting the body along the horizontal so that rather than there being a left and right, theres a top and bottom portion. I realised that if I messed this up it would be game over so I took my time marking things out. I used a craft knife to gently mark a line around the body. Next I used my dremel to mark a channel around, just to make sure that the line was straight.
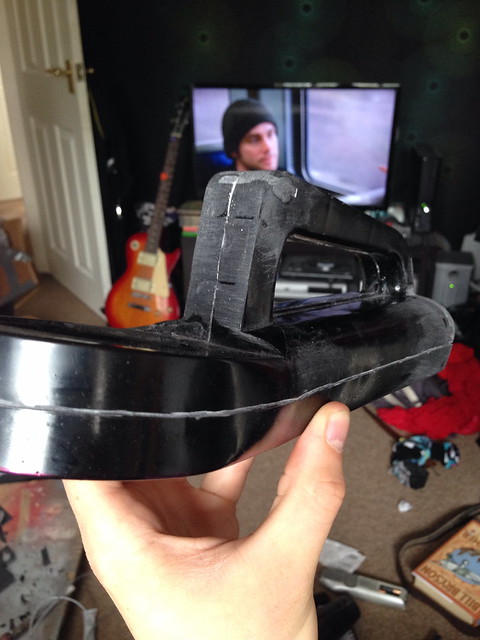
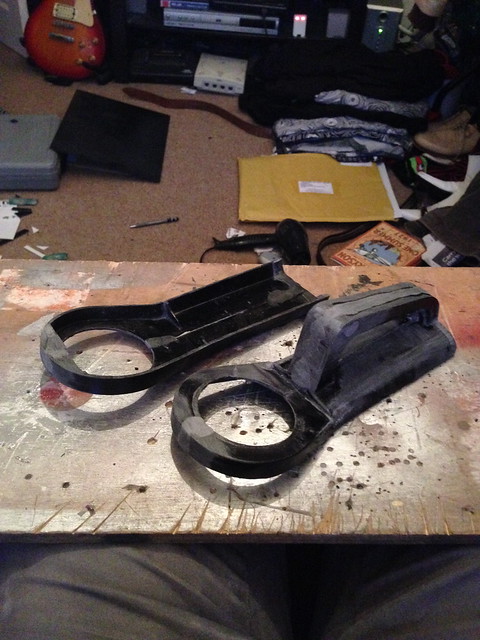
Following the channel, I then went ahead and slowly cut the body lengthwise. Defo squeaky bum moment, but voila!
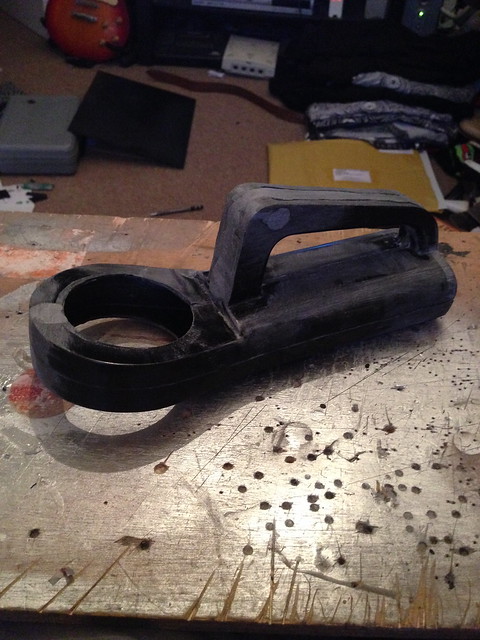
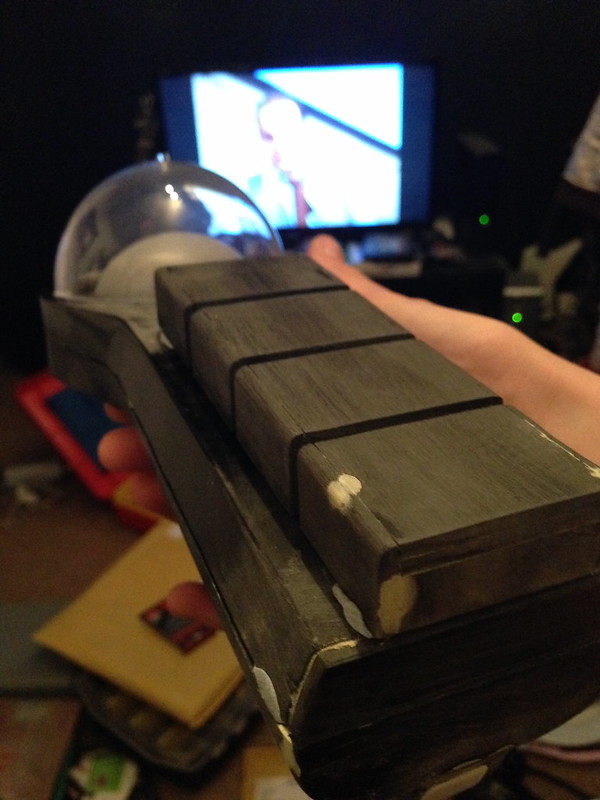
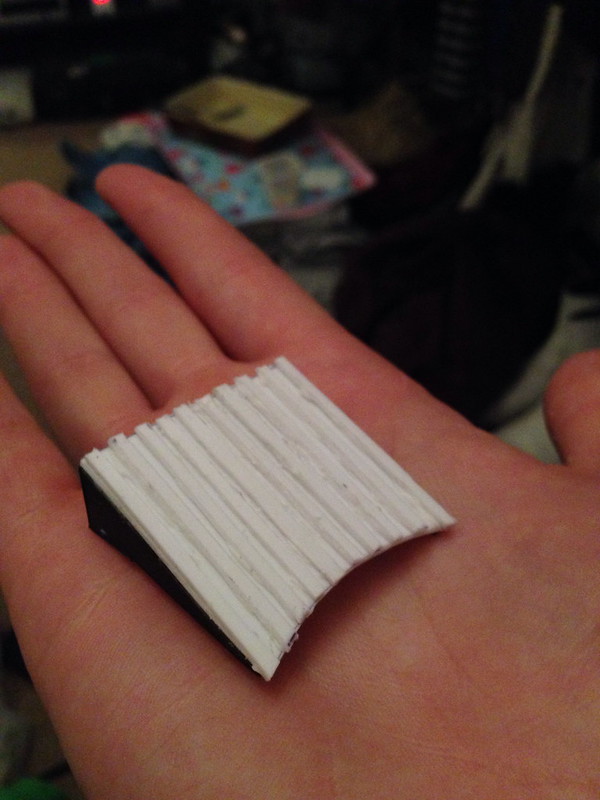
Now that the body was split, I began work on shaping the top portion. Using milliputt, I built up the front portion of the handle to create an angled box, then plated it with 0.80 styrene sheet. I filled the line along the top of the handle, sanded it smooth and also added the rectangles along the top
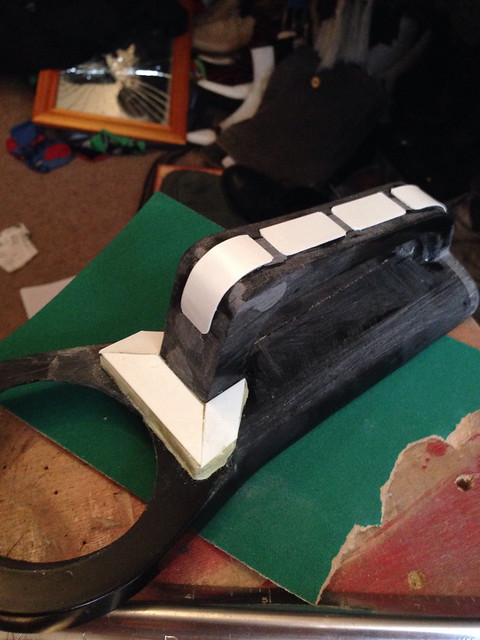
I then went back and sanded the front handle box and used my craft knives just to tidy up the lines slightly, make it a bit more crisp.
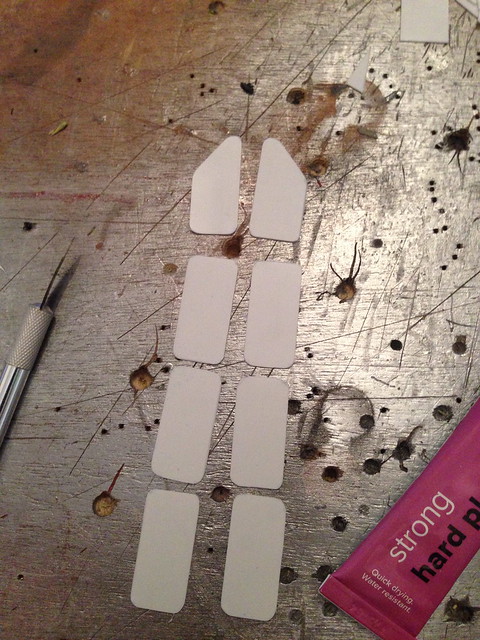
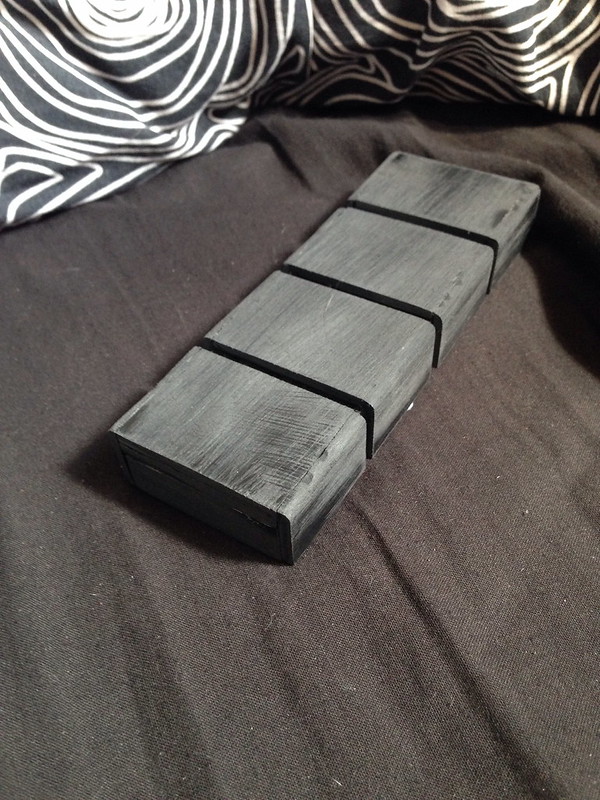
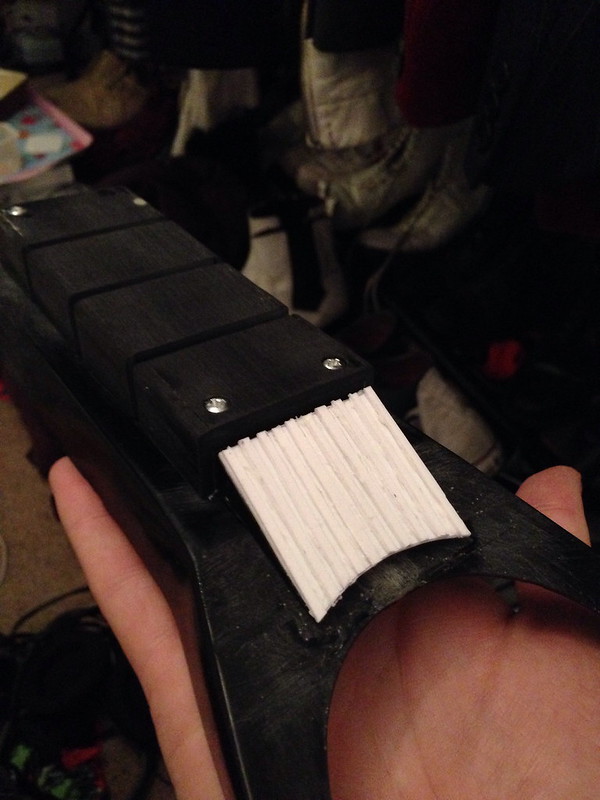
Next up was the side rectangles, I got them cut and using fine sand paper rounded the corners off, a really boring way to kill an hour!
And here they are attached! I must say, just adding these small details really makes it begin to look like a gigameter
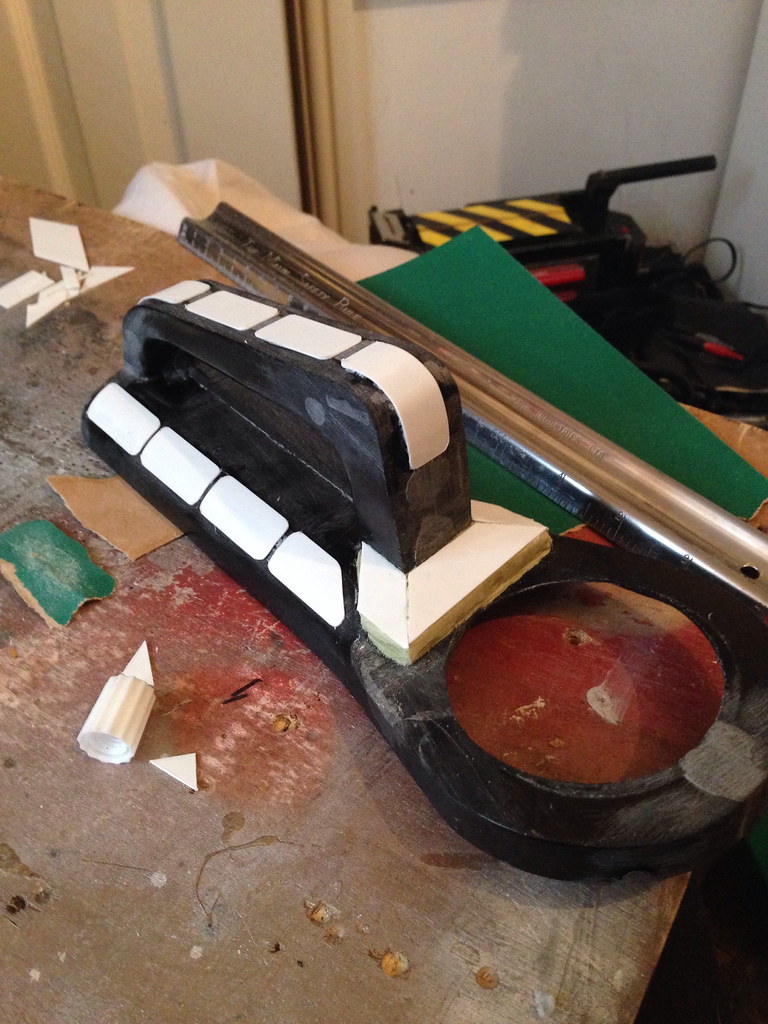
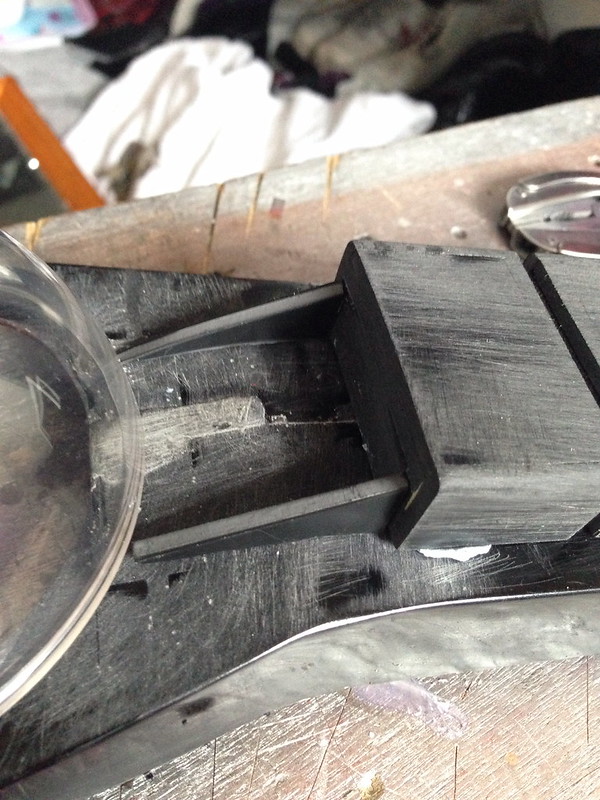
I decided that I would focus on the top portion of the giga first so next up was the microphone box, using the lower portion of the shell, I traced the general shape to create the base and lid of the new box. It's not complete yet, but here's where I'm at. A lot of it is eyeballing and guessing measurements, for the moment it's just blu-takked together to see how it looks. Gutting the realistic microphones wasn't nearly as difficult as I thought it would be.
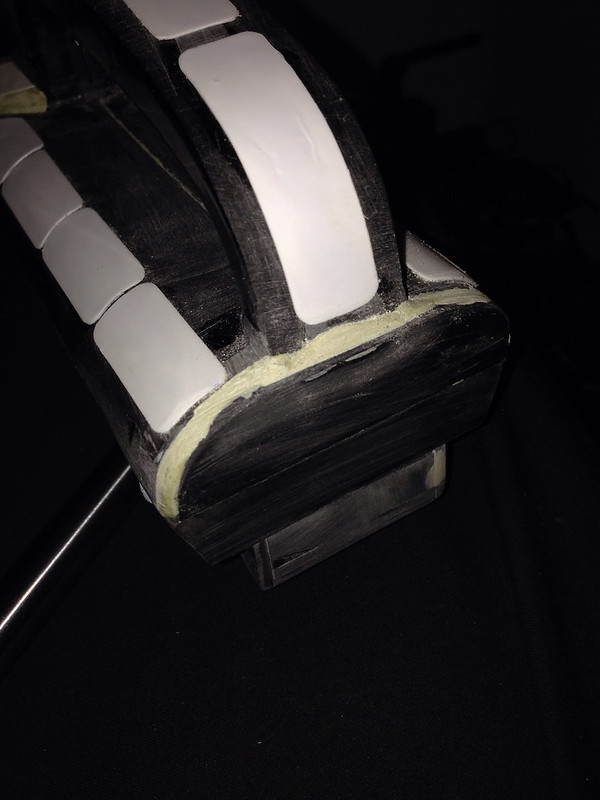
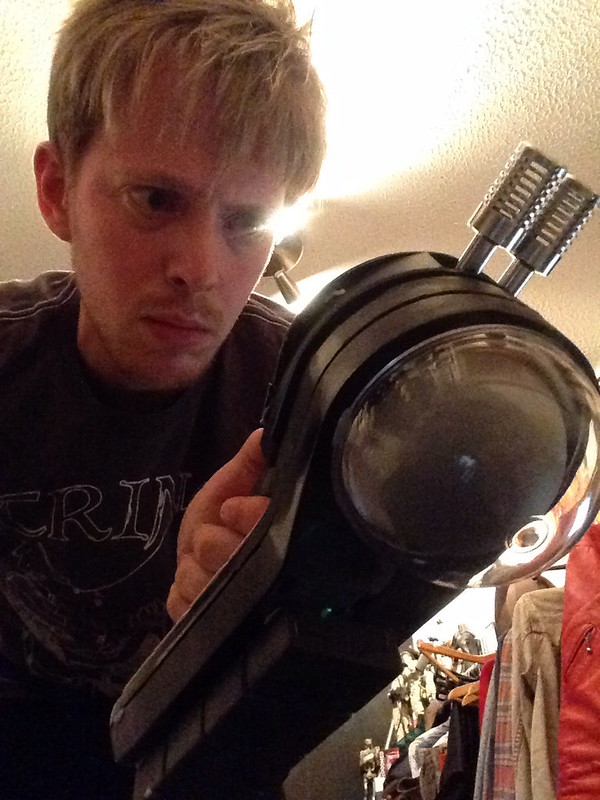
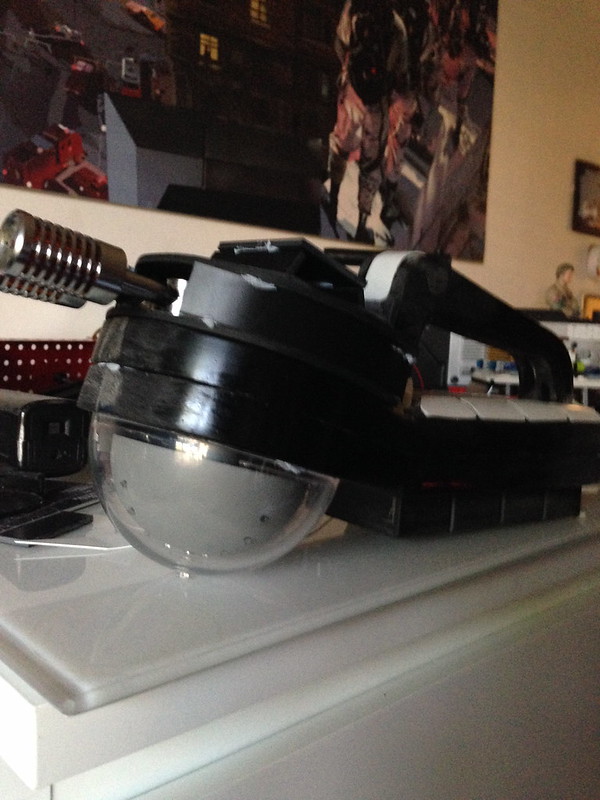
So here's where it's at so far! I'm very happy so far with how it's progressing and surprised how fast it is too! Elements of this I thought would take time and patience and whilst that's been true, it's really come together over the space of 2 weeks.
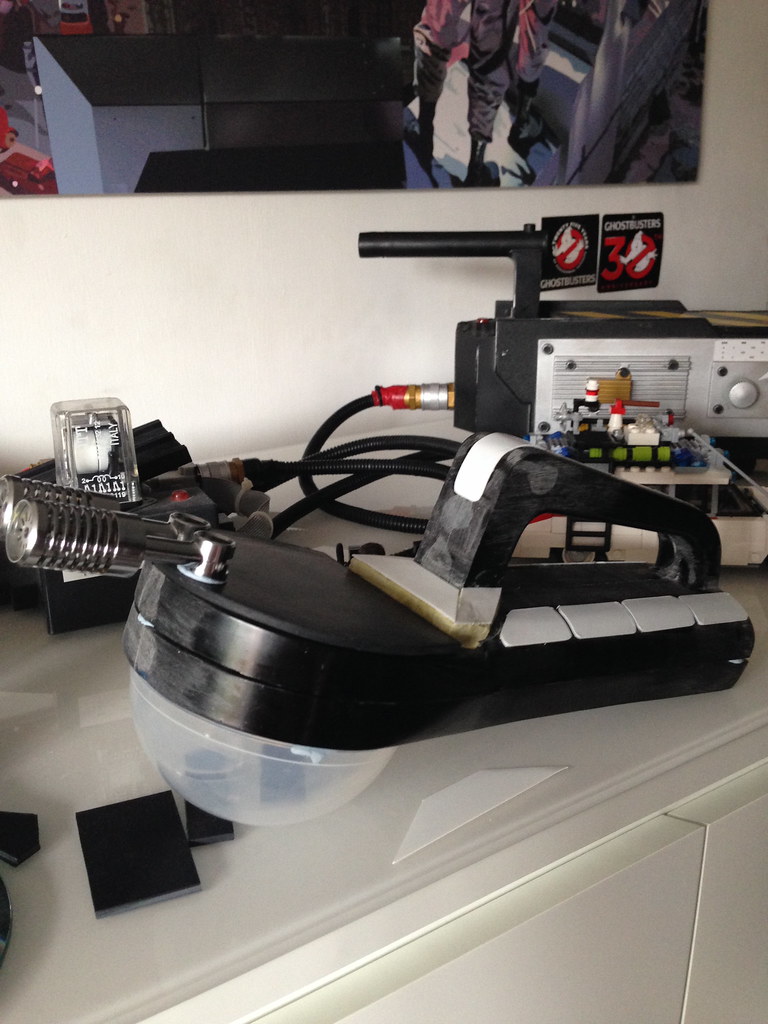
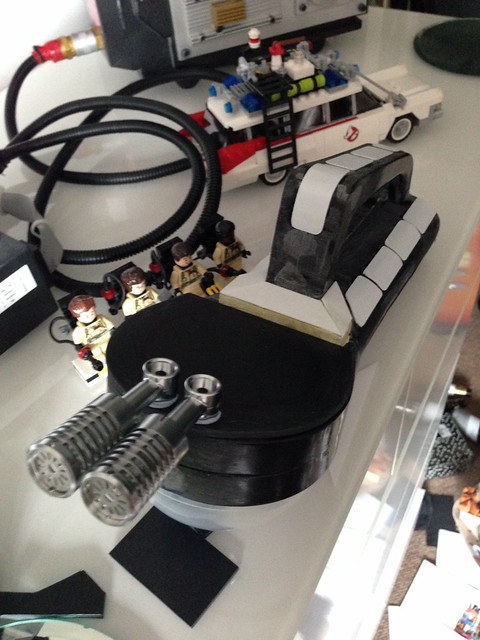
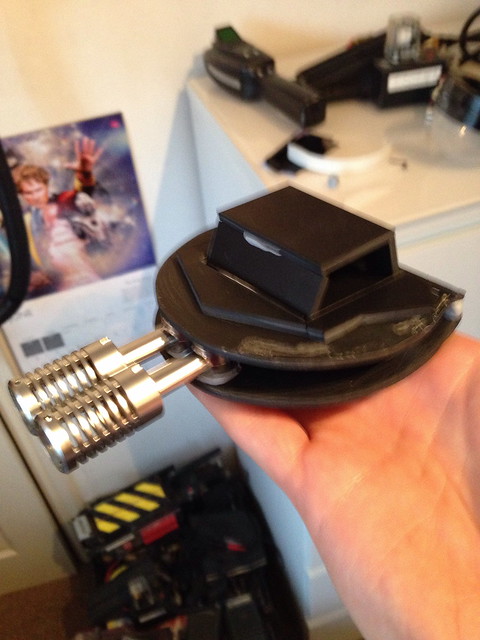
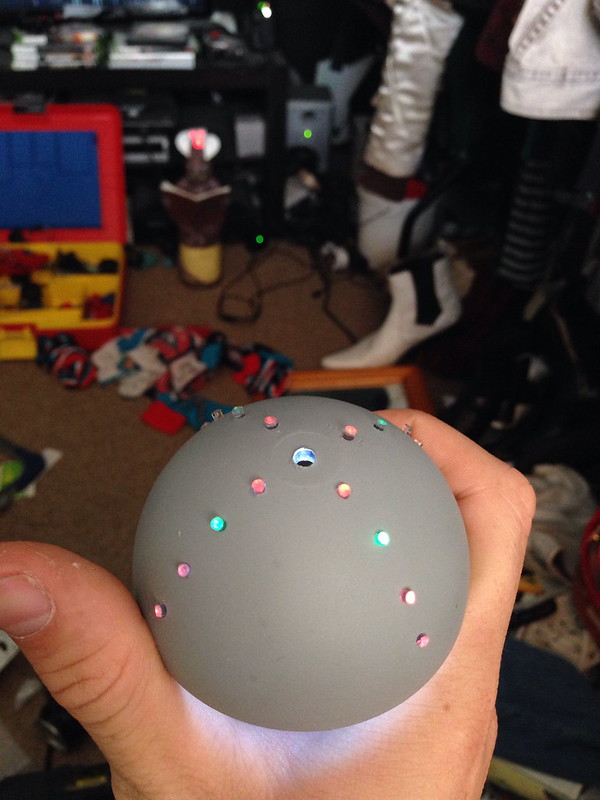
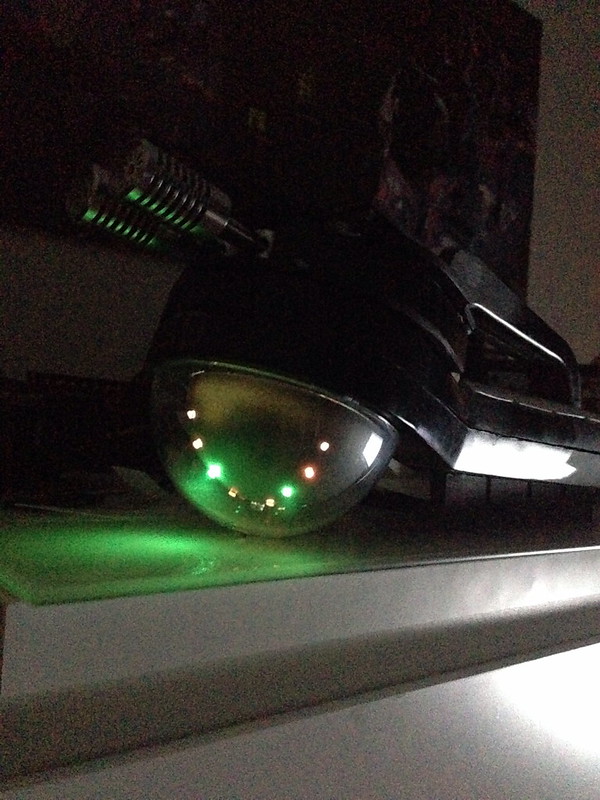
For the moment, the dome is just a place holder. It's one half of one of those plastic balls from those machines where you put £1 in, turn the handle and there's a small toy inside. The size of it is perfect but the clear dome has a money box hole cut into it. Ho hum, at least it lets me know what size I need, I've already found a pretty good supplier of the domes and very cheaply too. I'll be ordering a better dome soon.
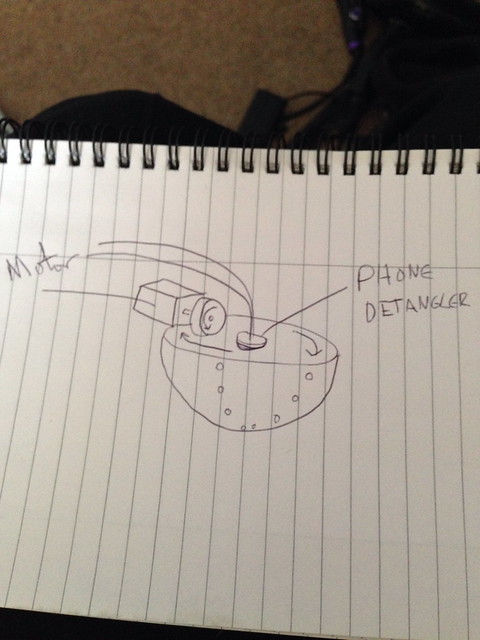
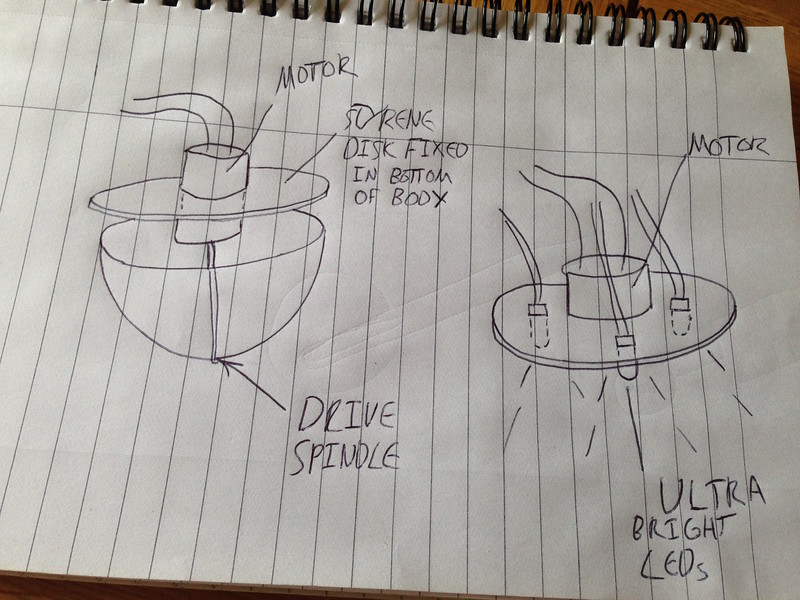
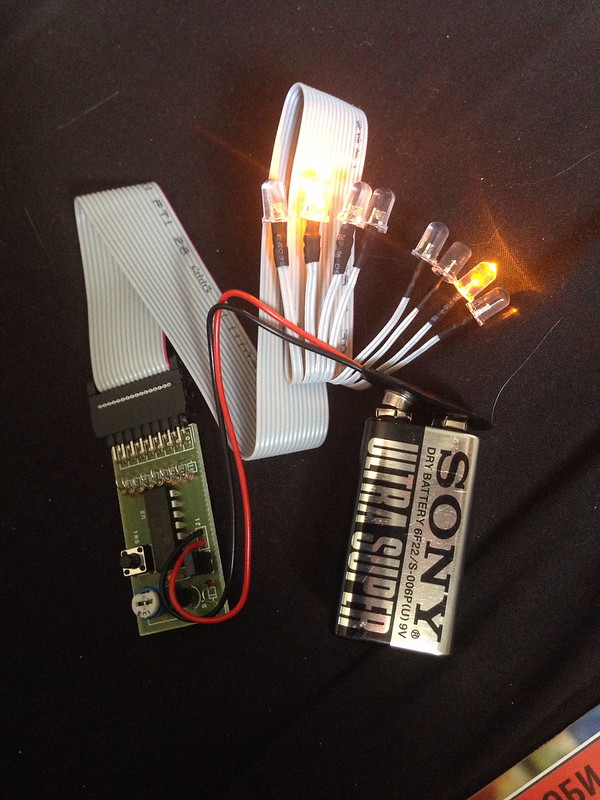
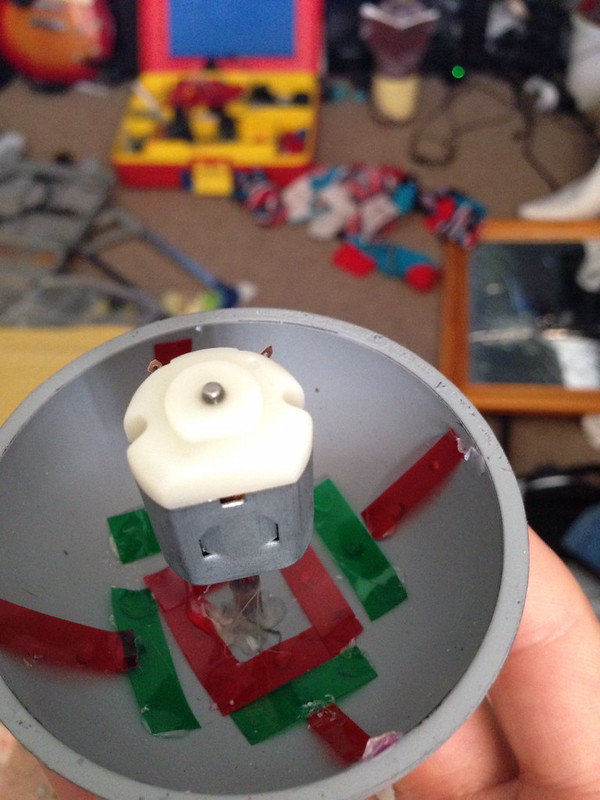
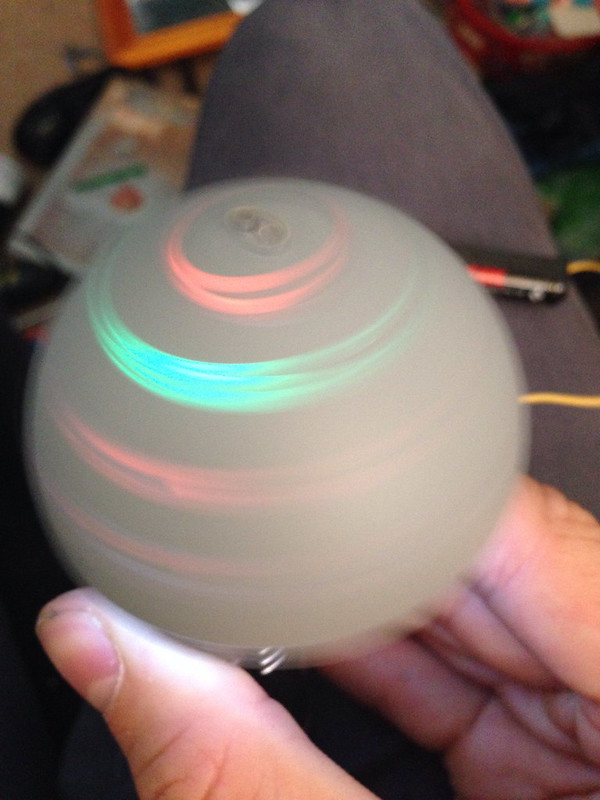
As mentioned before, I've been sketching ideas out for the electronics, for the dome I've hit upon the idea of having the circuit board inside the dome with the telephone detangler just acting as a power conduit to it. I've found a small chaser circuit about the size of a cyclotron lense that will fit in there nicely. I figured too that a rubber wheel off a toy mounted onto a small motor would be able to drive the dome round. This seems the best way I've figured of doing it so far, The chaser kit I've found only has 8 LEDs so only half the dome lights will light though I figure it will spin so fast it won't be noticed
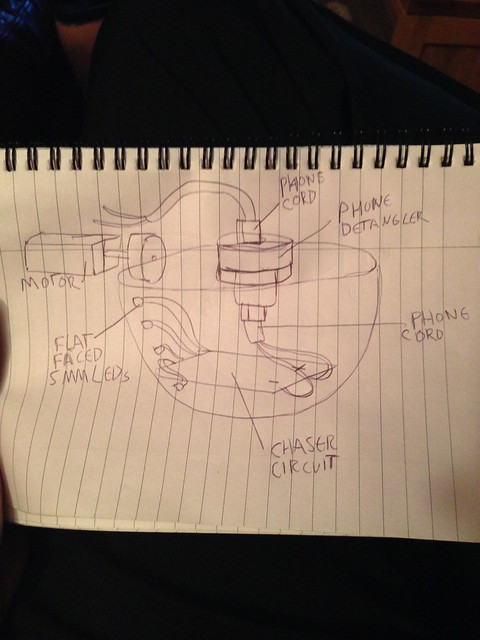
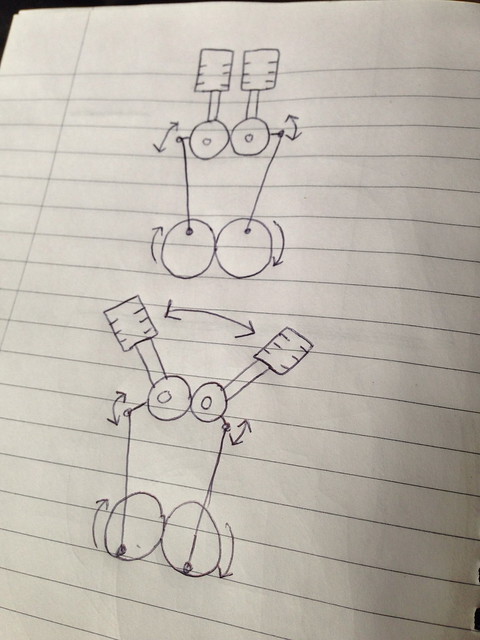
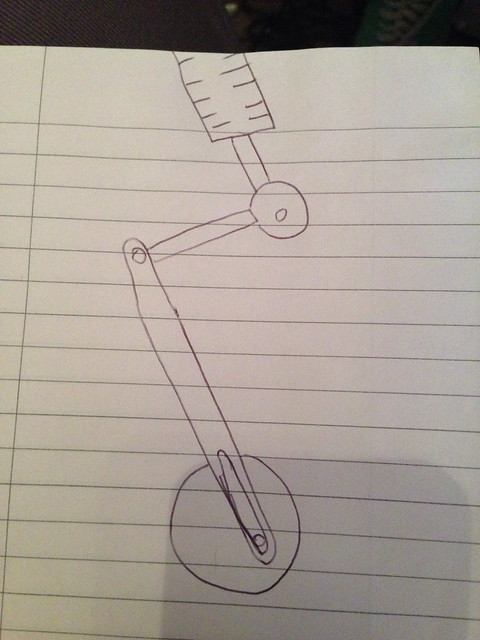
The microphone movement is still confusing me but I figure that this is probably the best method I've thought of. A fixed arm will be attached to each microphone that will attach to a hinged drive rod that attaches to a set of gears. I figured that the motor will most likely have to be positioned downward into the main body of the gigameter and not inside the microphone attachment. I get the impression that the original prop was modified after it's Star Trek appearance, getting rid of the numerical readout and replacing it with a motor to drive the microphones. There's so little room there to play with that if they managed to cram a motor into there, the guy who made the prop is a certified genius! The microphone box is about the size of a coffee cup and has a height of around 2cm at a guess.
Well, that's all I got so far I'll post more updates as they happen
Anyway, enough waffle, on with the build!
Here's the shell as it arrived, aint it pretty? The first thing I did was to get rid of all the mould struts on the inside. Next, I dremeled off the motor hump and using a piece of styrene, cut a piece to fit in the top part to match the other side. I used milliputt to fit the piece and then sanded it smooth to match the left piece
I then glued the two halves together using some strong plastic glue. I filled the inside of the handle with more milliputt which came in handy when I started to round the front of it. I also filled the rear flange of the body in preparation to sand that smooth too so it was more in line with the body.
Next came the bit that I was dreading the most, cutting the body along the horizontal so that rather than there being a left and right, theres a top and bottom portion. I realised that if I messed this up it would be game over so I took my time marking things out. I used a craft knife to gently mark a line around the body. Next I used my dremel to mark a channel around, just to make sure that the line was straight.
Following the channel, I then went ahead and slowly cut the body lengthwise. Defo squeaky bum moment, but voila!
Now that the body was split, I began work on shaping the top portion. Using milliputt, I built up the front portion of the handle to create an angled box, then plated it with 0.80 styrene sheet. I filled the line along the top of the handle, sanded it smooth and also added the rectangles along the top
I then went back and sanded the front handle box and used my craft knives just to tidy up the lines slightly, make it a bit more crisp.
Next up was the side rectangles, I got them cut and using fine sand paper rounded the corners off, a really boring way to kill an hour!
And here they are attached! I must say, just adding these small details really makes it begin to look like a gigameter
I decided that I would focus on the top portion of the giga first so next up was the microphone box, using the lower portion of the shell, I traced the general shape to create the base and lid of the new box. It's not complete yet, but here's where I'm at. A lot of it is eyeballing and guessing measurements, for the moment it's just blu-takked together to see how it looks. Gutting the realistic microphones wasn't nearly as difficult as I thought it would be.
So here's where it's at so far! I'm very happy so far with how it's progressing and surprised how fast it is too! Elements of this I thought would take time and patience and whilst that's been true, it's really come together over the space of 2 weeks.
For the moment, the dome is just a place holder. It's one half of one of those plastic balls from those machines where you put £1 in, turn the handle and there's a small toy inside. The size of it is perfect but the clear dome has a money box hole cut into it. Ho hum, at least it lets me know what size I need, I've already found a pretty good supplier of the domes and very cheaply too. I'll be ordering a better dome soon.
As mentioned before, I've been sketching ideas out for the electronics, for the dome I've hit upon the idea of having the circuit board inside the dome with the telephone detangler just acting as a power conduit to it. I've found a small chaser circuit about the size of a cyclotron lense that will fit in there nicely. I figured too that a rubber wheel off a toy mounted onto a small motor would be able to drive the dome round. This seems the best way I've figured of doing it so far, The chaser kit I've found only has 8 LEDs so only half the dome lights will light though I figure it will spin so fast it won't be noticed
The microphone movement is still confusing me but I figure that this is probably the best method I've thought of. A fixed arm will be attached to each microphone that will attach to a hinged drive rod that attaches to a set of gears. I figured that the motor will most likely have to be positioned downward into the main body of the gigameter and not inside the microphone attachment. I get the impression that the original prop was modified after it's Star Trek appearance, getting rid of the numerical readout and replacing it with a motor to drive the microphones. There's so little room there to play with that if they managed to cram a motor into there, the guy who made the prop is a certified genius! The microphone box is about the size of a coffee cup and has a height of around 2cm at a guess.
Well, that's all I got so far
Last edited by Bob Wobbaz on January 29th, 2015, 10:02 am, edited 7 times in total.
You did not use...the magic word....


 - By edspengler
 - By Fritz