

- July 22nd, 2014, 4:57 pm#4802382
This post may contain an affiliate link that helps support GBFans.com when you make a purchase at no additional cost to you.
Thanks for the encouragement guys. I've not had much time to make progress with it the past week, been busy getting my pack back together and working after an unfortunate mishap for a local convention, now that that's all sorted I can focus on this once more.
I plan on testing the mechanism for the microphones before mounting it inside the microphone housing (I'm making up part names as I go along, it just makes it easier). No sense in putting it in there and it being wrong. I think the biggest issue will be getting the gear ratio down so the movement is much slower. The motors I'm using are around 5-8 thousand RPM and I need to figure a way of greatly reducing that, otherwise my microphones will be a blur of movement. I'm thinking using a gearing system that will slow it down, reduce it down by having a series of small gears that connect with larger ones to reduce the number of turns. Ideally it needs to be 1 turn ever 2 seconds, looking at the footage of the gigameter in gb2, it takes a second for them to separate then another second to draw together again.
I've been looking into maybe a gearbox system, you can get them on ebay such as this one
http://www.ebay.co.uk/itm/TX45-2x-3v-5v ... 56621e00e2
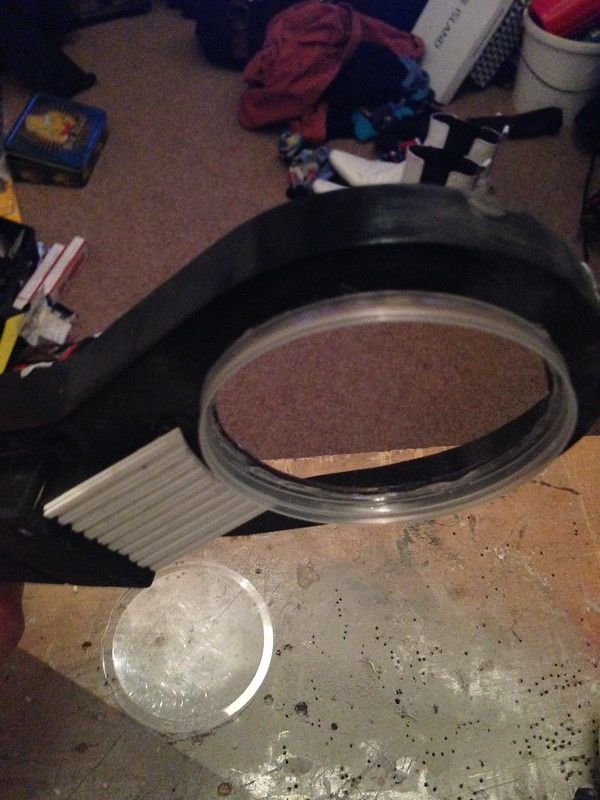
I've a few little things I need to do before I can properly mount the scan head dome into the body. I still need to attach the heat sink and cut the hole in the main body under the battery box so that the batteries can fit neatly. Once I'm done with that, I can prime, paint and get the scan dome mounted
I'll update when I can do If anyone has any ideas regarding the microphone movement please let me know, any help is greatly appreciated
Thanks for the encouragement guys. I've not had much time to make progress with it the past week, been busy getting my pack back together and working after an unfortunate mishap for a local convention, now that that's all sorted I can focus on this once more.
I plan on testing the mechanism for the microphones before mounting it inside the microphone housing (I'm making up part names as I go along, it just makes it easier). No sense in putting it in there and it being wrong. I think the biggest issue will be getting the gear ratio down so the movement is much slower. The motors I'm using are around 5-8 thousand RPM and I need to figure a way of greatly reducing that, otherwise my microphones will be a blur of movement. I'm thinking using a gearing system that will slow it down, reduce it down by having a series of small gears that connect with larger ones to reduce the number of turns. Ideally it needs to be 1 turn ever 2 seconds, looking at the footage of the gigameter in gb2, it takes a second for them to separate then another second to draw together again.
I've been looking into maybe a gearbox system, you can get them on ebay such as this one
http://www.ebay.co.uk/itm/TX45-2x-3v-5v ... 56621e00e2
I've a few little things I need to do before I can properly mount the scan head dome into the body. I still need to attach the heat sink and cut the hole in the main body under the battery box so that the batteries can fit neatly. Once I'm done with that, I can prime, paint and get the scan dome mounted
I'll update when I can do
You did not use...the magic word....

- July 23rd, 2014, 9:52 am#4802450
Would some sort of potentiometer not be able to influence the speed of the motor?


- July 23rd, 2014, 7:26 pm#4802513
Gears would work, as would adding in appropriately-sized resistors in line with the motor itself. Can't say exactly how much, though, without testing.
Twitter: @ThatNerdInATie
Facebook: That Nerd In A Tie
Facebook: That Nerd In A Tie
- July 24th, 2014, 4:03 pm#4802658
This post may contain an affiliate link that helps support GBFans.com when you make a purchase at no additional cost to you.
Ben, thanks for the suggestion, I've had a look into it. If I was going to go down that route it would require more than just hooking up a pot to a motor, the voltage and current would have to be matched carefully to prevent the pot burning out . I'd need a speed regulator circuit, unfortunately, a lot of these circuits are geared towards motors with a larger volt supply and have pretty hefty heatsinks on them, I don't want to risk melting part of my shell from a heatsink getting too hot. I have found this kit which might do the job however
http://www.bakatronics.com/shop/item.aspx?itemid=383
The other thing I looked into was motors that spin at either 30 or 60rpm. Now I've looked carefully at the scenes where the microphones are moving and it's roughly 2 seconds for a completed cycle, thats from being together, to going apart to being together again. Now, if I had the drive spindle from the motor attached directly to the cogs for the the microphone movement then a 30rpm set up would be perfect. If I have it set up with an 3 cog resting against the two microphone cogs then I believe a 60rpm would be better. here's the two motors I've found, the only issue I think may be size.
http://www.ebay.co.uk/itm/Rectangle-3V- ... 1c398a95d9
http://www.ebay.co.uk/itm/3V-60RPM-Torq ... 4ab8744f13
Anyway, ON WITH THE UPDATE!
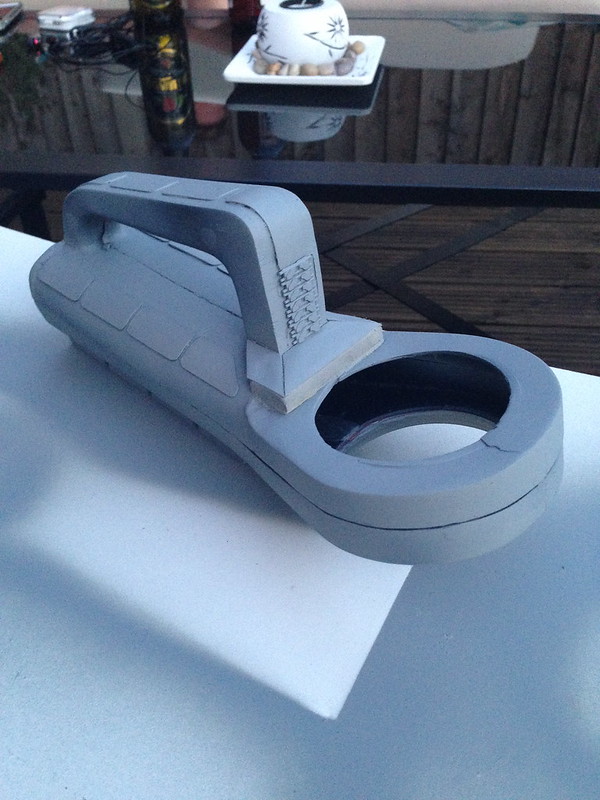
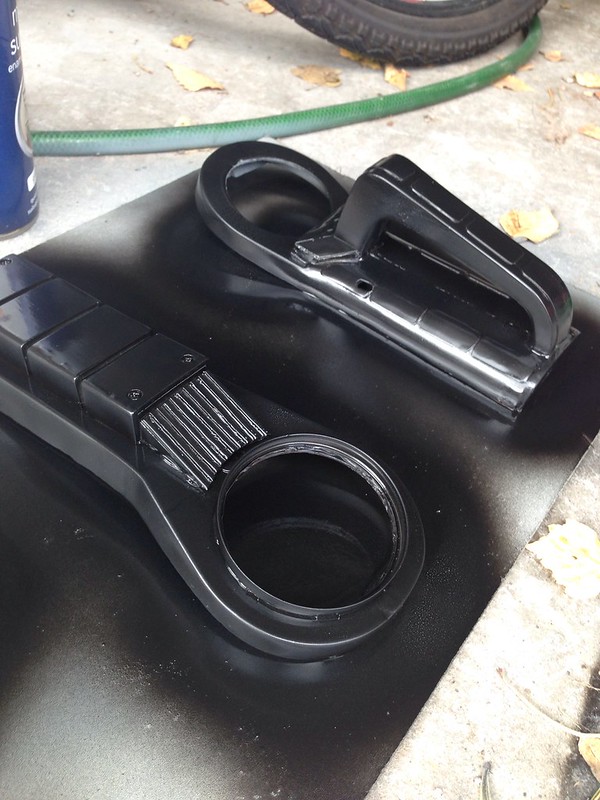
So after making the heatsink, I attached it to the body, made sure that it was positioned correctly for the dome. I then added the scan dome lip, a hoop around the opening for the dome, to the body. A pringles lid turned out to be the exact diameter and height I needed!
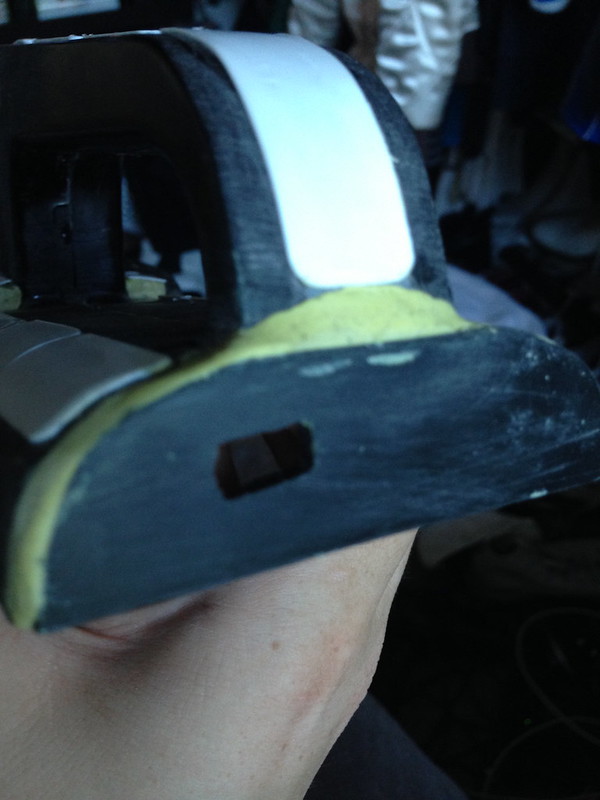
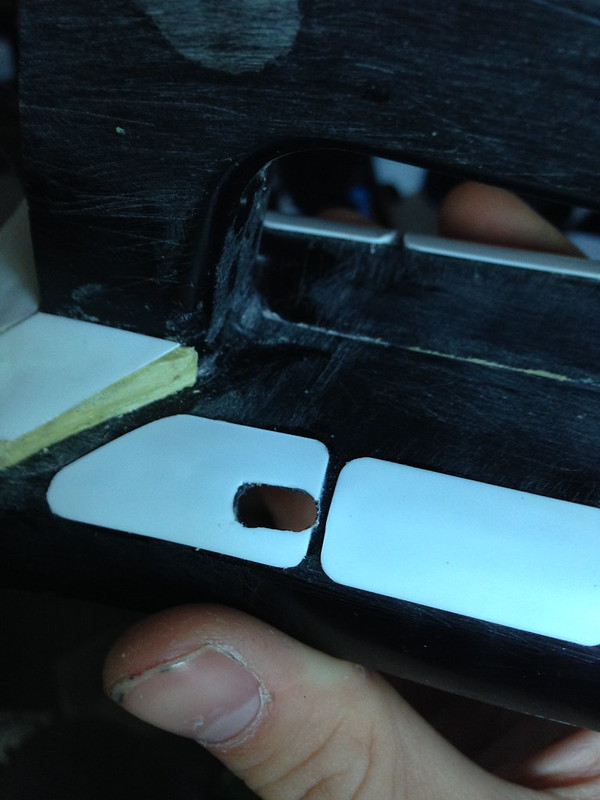
I then drilled and shaped the holes for the switches on the main body.
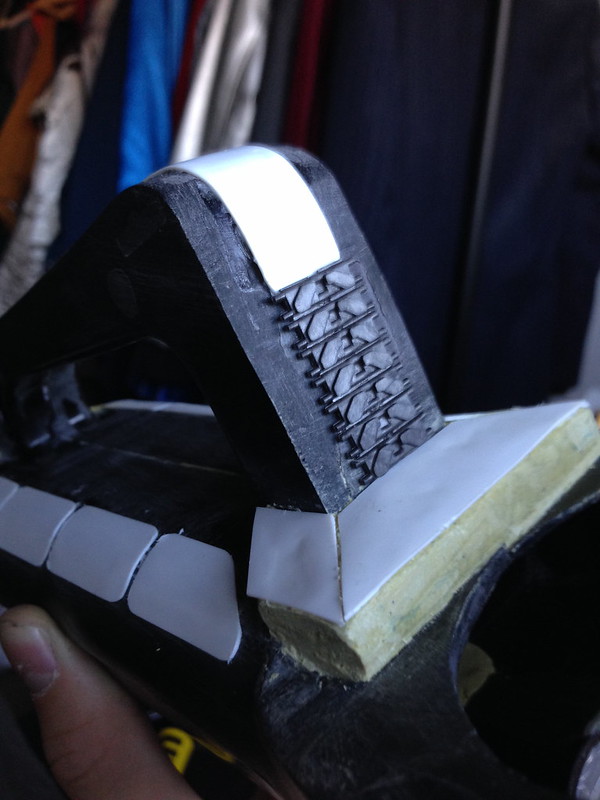
After getting some tank tread, the same tank tread as used on the slimeblower, from a friend, I added the extra detail to the front of the handle
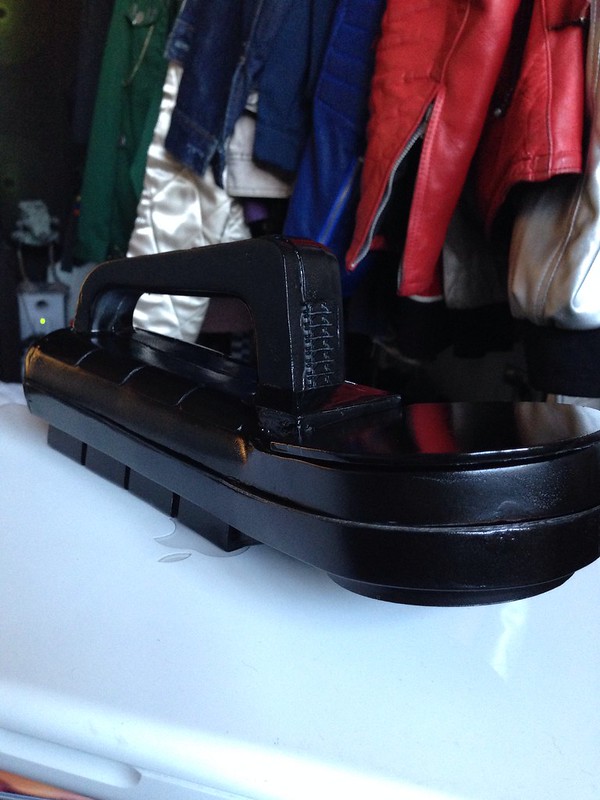
At this point she was ready for priming!
First coat of primer, I'm really quite happy how it's looking! There's a few things I need to tidy up still, but overall the main shell is done
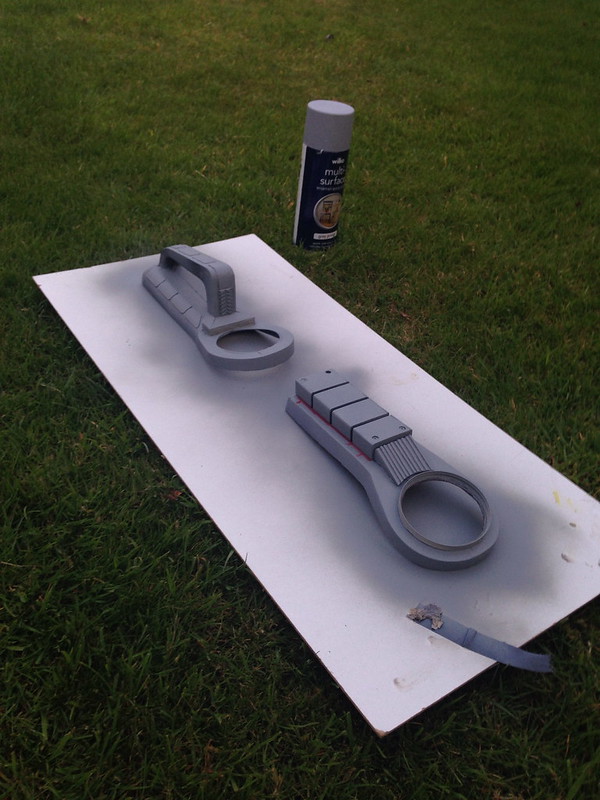
And here's the shell as it is now
Ben, thanks for the suggestion, I've had a look into it. If I was going to go down that route it would require more than just hooking up a pot to a motor, the voltage and current would have to be matched carefully to prevent the pot burning out . I'd need a speed regulator circuit, unfortunately, a lot of these circuits are geared towards motors with a larger volt supply and have pretty hefty heatsinks on them, I don't want to risk melting part of my shell from a heatsink getting too hot. I have found this kit which might do the job however
http://www.bakatronics.com/shop/item.aspx?itemid=383
The other thing I looked into was motors that spin at either 30 or 60rpm. Now I've looked carefully at the scenes where the microphones are moving and it's roughly 2 seconds for a completed cycle, thats from being together, to going apart to being together again. Now, if I had the drive spindle from the motor attached directly to the cogs for the the microphone movement then a 30rpm set up would be perfect. If I have it set up with an 3 cog resting against the two microphone cogs then I believe a 60rpm would be better. here's the two motors I've found, the only issue I think may be size.
http://www.ebay.co.uk/itm/Rectangle-3V- ... 1c398a95d9
http://www.ebay.co.uk/itm/3V-60RPM-Torq ... 4ab8744f13
Anyway, ON WITH THE UPDATE!
So after making the heatsink, I attached it to the body, made sure that it was positioned correctly for the dome. I then added the scan dome lip, a hoop around the opening for the dome, to the body. A pringles lid turned out to be the exact diameter and height I needed!
I then drilled and shaped the holes for the switches on the main body.
After getting some tank tread, the same tank tread as used on the slimeblower, from a friend, I added the extra detail to the front of the handle
At this point she was ready for priming!
First coat of primer, I'm really quite happy how it's looking! There's a few things I need to tidy up still, but overall the main shell is done
And here's the shell as it is now
You did not use...the magic word....
- July 24th, 2014, 7:25 pm#4802694
Looking great, man!
Twitter: @ThatNerdInATie
Facebook: That Nerd In A Tie
Facebook: That Nerd In A Tie
- August 2nd, 2014, 4:59 pm#4803755
Hey guys, another update! Been crazy busy with work the past few weeks but I've managed to make some good progress with the gigameter.
Firstly, after looking at the new photo that's surfaced of Egon holding the gigameter, there's a noticeable lip between the top and lower portions of the shell. I had noticed that AZ Spidey had included this detail on his build and shells but it was missing on Cyland's build and very difficult to see if it was there on the screen grabs and in the film. I cut out the lip using styrene, wow, what a difference it makes. It really tidies up the shell and makes the lines that much crisper
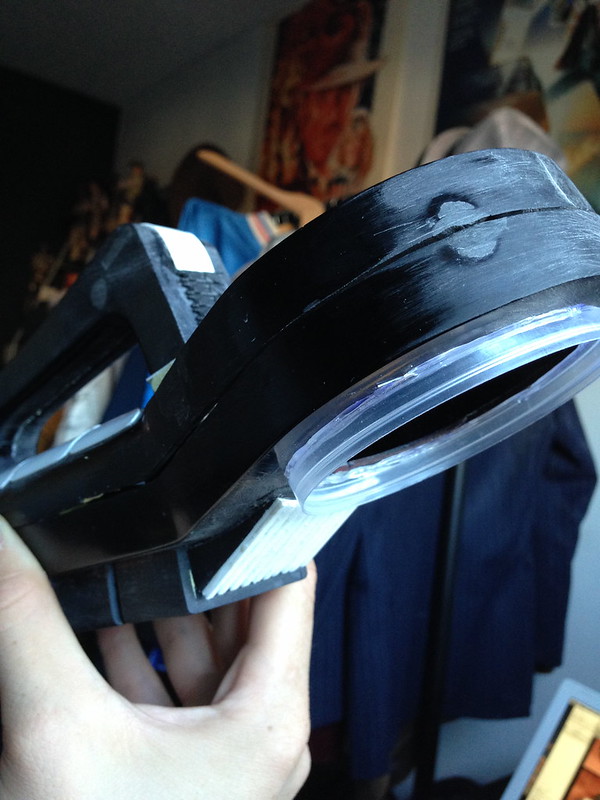
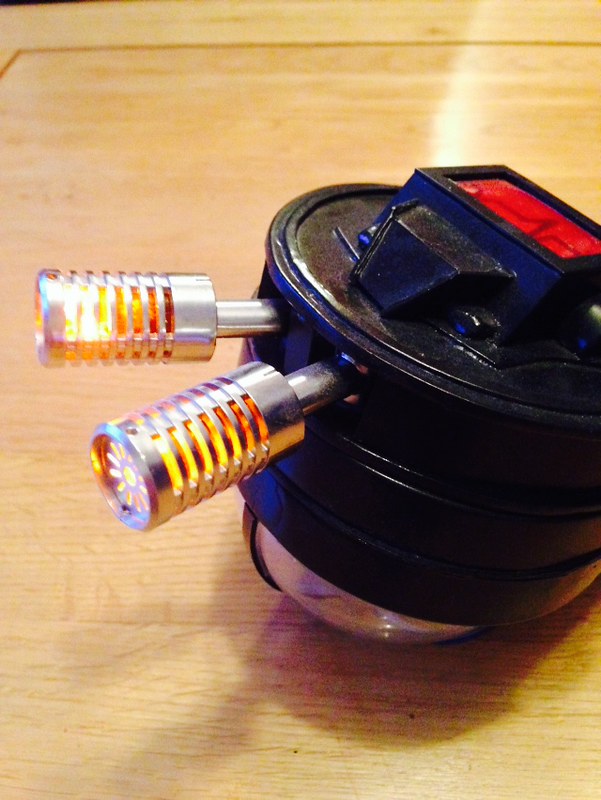
I suppose the biggest update would be that I fitted the LEDs into the microphones! This was far more fiddly than I anticipated. The 5mm LEDs were to big to just push up into the microphone head so I had to cut them off. I then threaded the ribbon cable through and soldered 3mm ultra bright orange LEDs in their place. Once all soldered and properly insulated with heat shrink tubing, it was just a matter of pushing them into position.
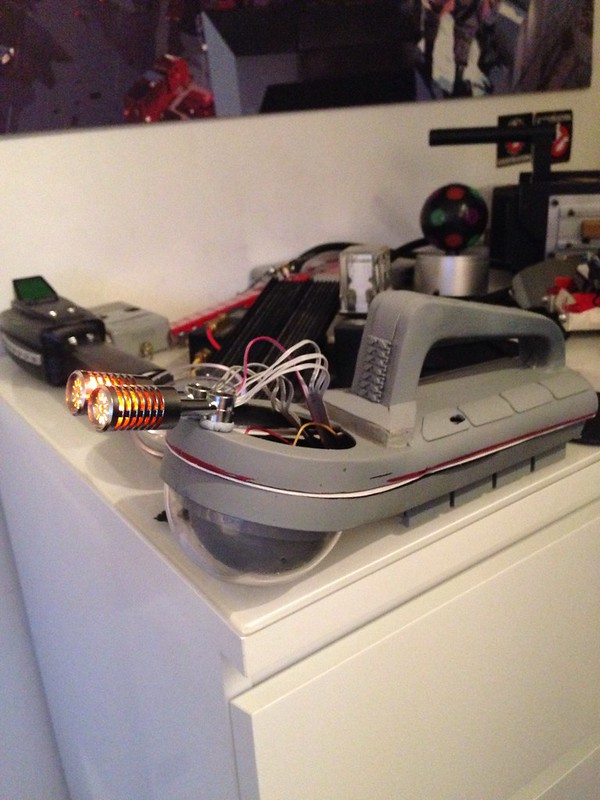
As you can see, it's a bit of a rat's nest of wiring in there at the moment, it's going to be all tidied up before I finally close it up though

And here's a video of it in action enjoy!
https://www.flickr.com/photos/62174436@N08/14809702811/
Firstly, after looking at the new photo that's surfaced of Egon holding the gigameter, there's a noticeable lip between the top and lower portions of the shell. I had noticed that AZ Spidey had included this detail on his build and shells but it was missing on Cyland's build and very difficult to see if it was there on the screen grabs and in the film. I cut out the lip using styrene, wow, what a difference it makes. It really tidies up the shell and makes the lines that much crisper
I suppose the biggest update would be that I fitted the LEDs into the microphones! This was far more fiddly than I anticipated. The 5mm LEDs were to big to just push up into the microphone head so I had to cut them off. I then threaded the ribbon cable through and soldered 3mm ultra bright orange LEDs in their place. Once all soldered and properly insulated with heat shrink tubing, it was just a matter of pushing them into position.
As you can see, it's a bit of a rat's nest of wiring in there at the moment, it's going to be all tidied up before I finally close it up though
And here's a video of it in action
https://www.flickr.com/photos/62174436@N08/14809702811/
You did not use...the magic word....
- August 10th, 2014, 5:26 pm#4804803
Okie Dokie, Time for an update!
And I have been mega busy!
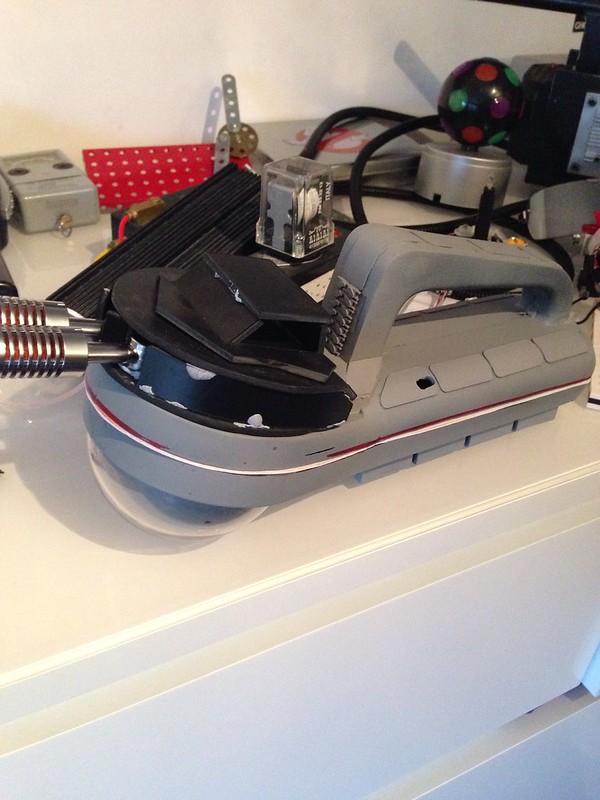
First of all, now that the main shell is finished I decided to paint it, went with metallic black, has metallic flecks in the paint, the same as the PKE
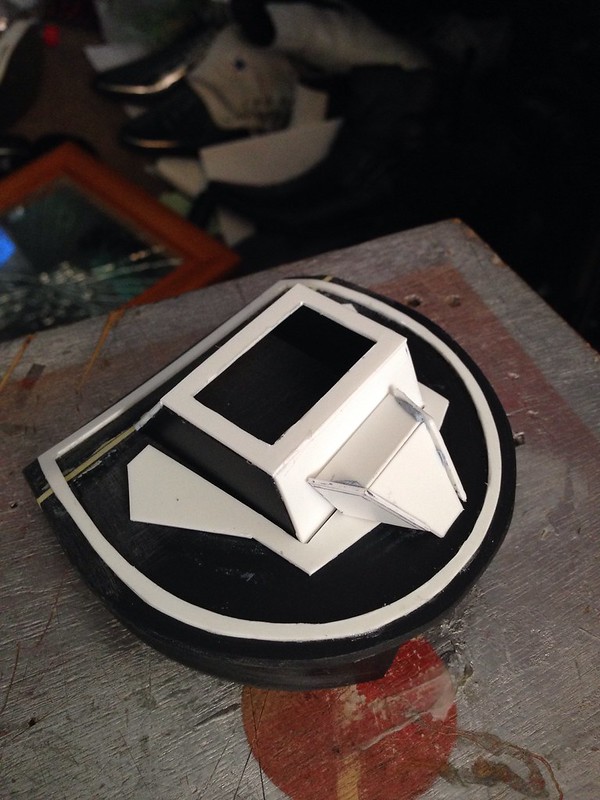
I've also started afresh with the microphone housing, not complete yet but definitely coming along very nicely
BUUUUUUUUUUT I suppose the biggest update would be....this
https://www.flickr.com/photos/62174436@N08/14900784433/
Since filming the video I've rearranged the gears and the noise is greatly reduced. My dad is going to bring me some grease to lubricate the gears, further reducing the noise. Let me tell you, getting the mechanism right was a real pain in the ass, very fiddly and precise.
So what's left to do? Well I have to finish off the microphone housing and fix the dome in place, a bit of painting but that's about it, it's probably going to be finished by next week
And I have been mega busy!
First of all, now that the main shell is finished I decided to paint it, went with metallic black, has metallic flecks in the paint, the same as the PKE
I've also started afresh with the microphone housing, not complete yet but definitely coming along very nicely
BUUUUUUUUUUT I suppose the biggest update would be....this
https://www.flickr.com/photos/62174436@N08/14900784433/
Since filming the video I've rearranged the gears and the noise is greatly reduced. My dad is going to bring me some grease to lubricate the gears, further reducing the noise. Let me tell you, getting the mechanism right was a real pain in the ass, very fiddly and precise.
So what's left to do? Well I have to finish off the microphone housing and fix the dome in place, a bit of painting but that's about it, it's probably going to be finished by next week
You did not use...the magic word....

- August 11th, 2014, 3:15 am#4804850
Awesome Luke. Looking forward to seeing the final product.
For anyone reading this thread, I've had a closer look at this build and can tell you it is awesome. Luke's attention to detail is amazing in making this a great giga meter.
Keep it up Luke.
For anyone reading this thread, I've had a closer look at this build and can tell you it is awesome. Luke's attention to detail is amazing in making this a great giga meter.
Keep it up Luke.
- August 11th, 2014, 3:27 am#4804851
That's a interesting comment ? According to this thread on UKGB it's also your build ? http://www.theukghostbusters.co.uk/foru ... =12&t=2175
- August 11th, 2014, 6:48 am#4804866
Me and Simon have been collaboratively working on our gigameters. We've shared our ideas and concepts for the builds, electronics, functions etc. What information i've found I've shared with him and vice versa. A lot of going through what footage there is and stepping through it slowly to figure out which switches do what, how many lights in a sequence, that sort of thing. Simon hasn't begun his build yet, he has a shell but it needs a lot of tidying up. When he stars he will be using the same methods I've used in mine
You did not use...the magic word....
- August 11th, 2014, 11:09 am#4804880
We were originally going to show both builds on one thread. Unfortunately after I started that post on the UKGB forum, the amount of tidying up on my shell was a lot worse than expected and then put on hold after I had to fork out a considerable amount of cash on my car.
Yes we've collaborated on it and the mechanism used will be the same, however the builds of each shell will be different.
Yes we've collaborated on it and the mechanism used will be the same, however the builds of each shell will be different.

- August 14th, 2014, 11:01 pm#4805306
Awesome job!
My GBfans Feedback: http://www.gbfans.com/community/viewtop ... 32&t=17780
Website: http://www.toddcookdesigns.com
Facebook: www.facebook.com/toddcookdesigns
Website: http://www.toddcookdesigns.com
Facebook: www.facebook.com/toddcookdesigns
- August 18th, 2014, 6:09 pm#4805863
Well guys, it's finished Last few weeks have been figuring out the gearing and motor rigs for the the electronics, as well as refining a few concepts for it's operation but it's done Immensely happy with the end product, I hope you are too.
Luke
Luke
You did not use...the magic word....

- August 18th, 2014, 7:49 pm#4805881
Very cool! You're making me want to work on mine now.
Jack Doud
http://www.bloody-plastic.com/costumes.html
My Oddball props:
Statue of Liberty Controller, Slime Scoop, Keymaster Colander Helmet, KUD Meter.
http://www.bloody-plastic.com/costumes.html
My Oddball props:
Statue of Liberty Controller, Slime Scoop, Keymaster Colander Helmet, KUD Meter.
- August 18th, 2014, 9:38 pm#4805894
Fantastic!
~Jay
 GB1 and GB 2 Uniform Build Thread: http://www.gbfans.com/community/viewtop ... =4&t=34828
GB1 Proton Pack Build Thread: http://www.gbfans.com/community/viewtop ... =2&t=34784Actual physical updates!
GB1 and GB 2 Uniform Build Thread: http://www.gbfans.com/community/viewtop ... =4&t=34828GB1 Proton Pack Build Thread: http://www.gbfans.com/community/viewtop ... =2&t=34784Actual physical updates!

- January 29th, 2015, 9:59 am#4825381
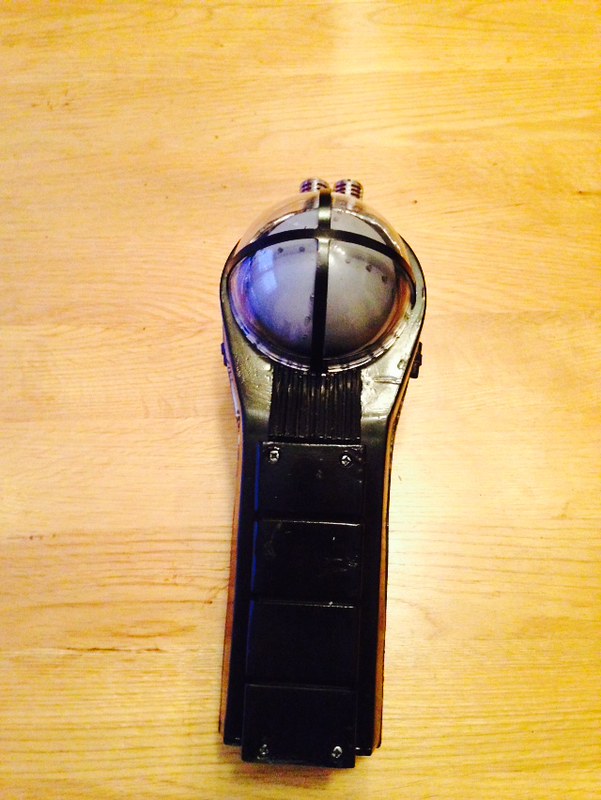
Been meaning to put some nice pics up of it on here, seeing as I'm snowed in and off work, I thought why not 


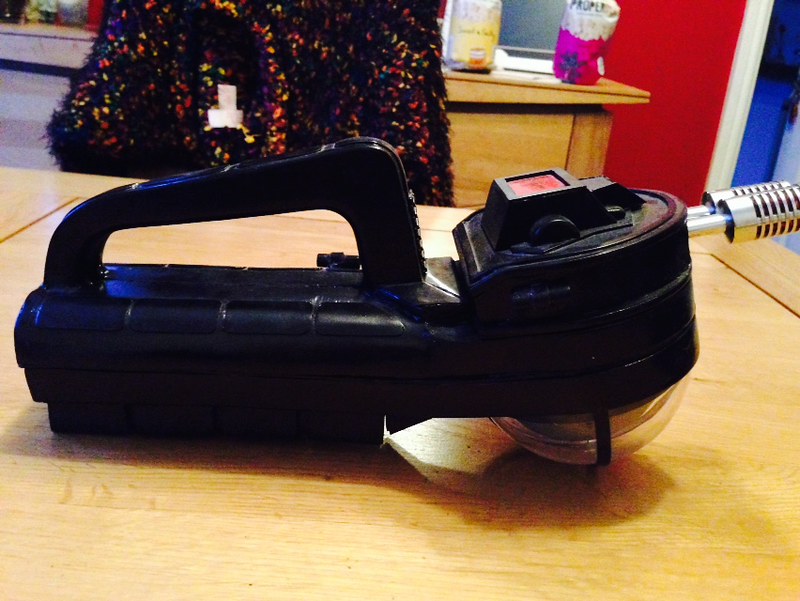
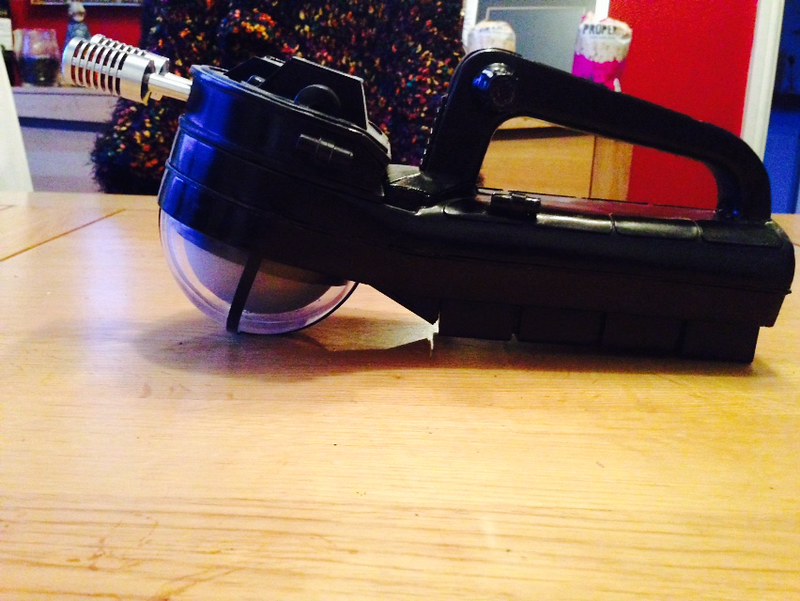

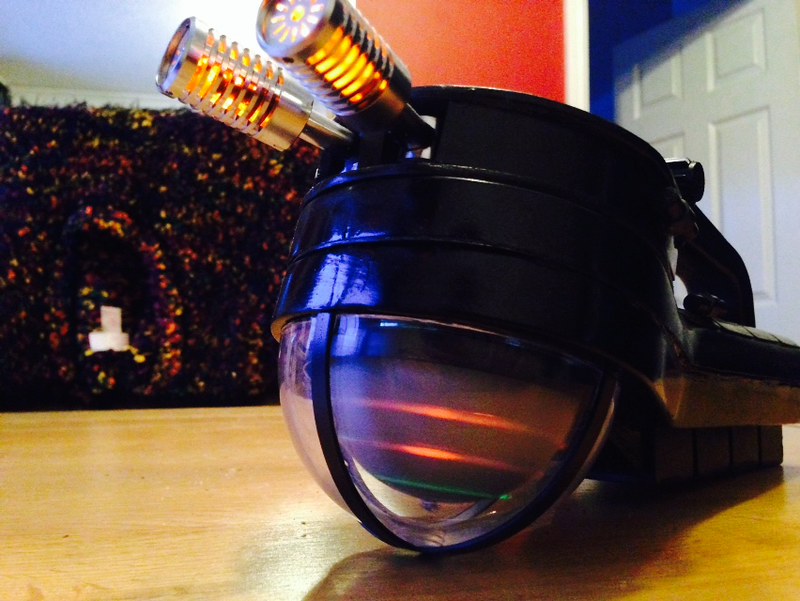

And a little side by side comparison with the PKE meter. You can see it's not much bigger in length, the camera and angle in the film really do make it look so much more larger. Weight wise, it's slightly heavier than the Matty PKE, but not by much.
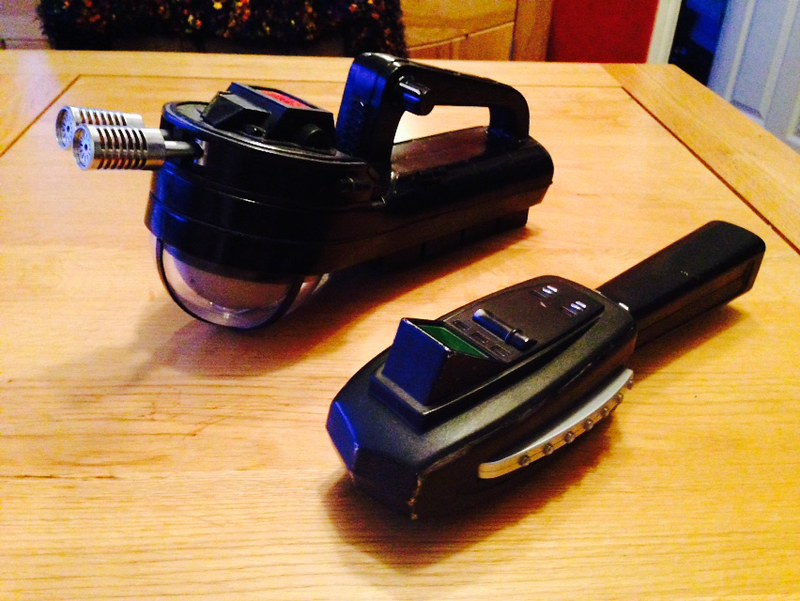
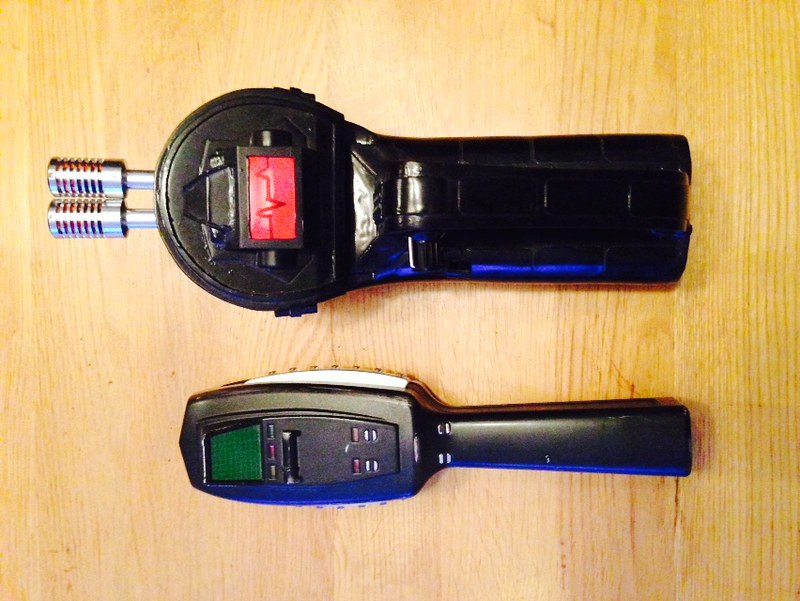
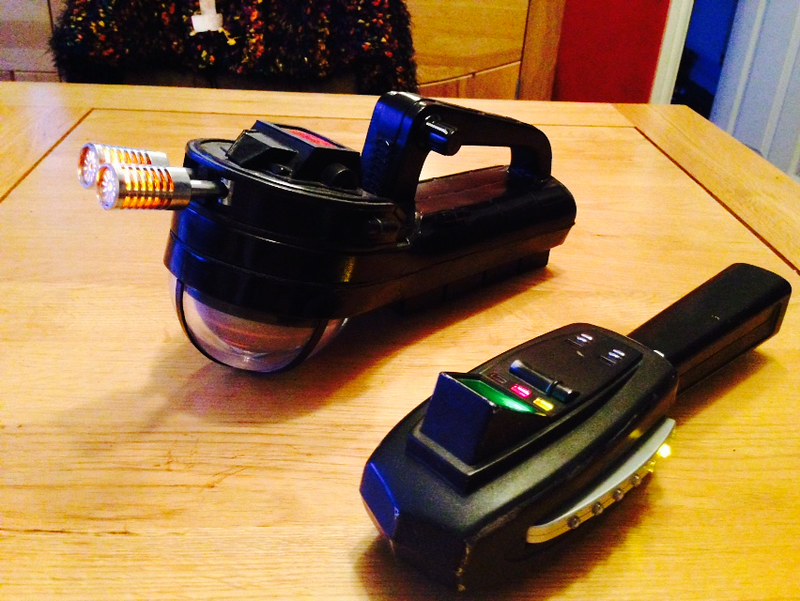
And a little side by side comparison with the PKE meter. You can see it's not much bigger in length, the camera and angle in the film really do make it look so much more larger. Weight wise, it's slightly heavier than the Matty PKE, but not by much.
You did not use...the magic word....

- January 29th, 2015, 11:06 am#4825397
Man that is some Giga Meter. I have to see this in person sometime. Hopefully see you when I gain UKGB clearance
Ghostbusters is for life, not just for Halloween
GB2 Stantz/Sony Lobby Build =========> http://www.gbfans.com/community/viewtop ... =2&t=38478
GB Hero Build=========> viewtopic.php?f=2&t=40702
GB2 Stantz/Sony Lobby Build =========> http://www.gbfans.com/community/viewtop ... =2&t=38478
GB Hero Build=========> viewtopic.php?f=2&t=40702
HasLab Plasma Series Neutrona Wands | Voltage Readouts??
 - By pda4ever
Also, sorry I can’t answer the question, but[…]
"Ghostbusters: Afterlife" Feature Talkback Thread
 - By mrmichaelt
There's some fun dialogue TV-edits, a replacement[…]
 - By UncannyGirl
Thanks The_Y33TER ! Confirmation there's no elect[…]
A little sneak preview of one of the bedrock parts[…]