#4805738
At that point, I attached the Spengler hook and then I put my shell on the mobo, had to run the tap through the mounting brackets to clean up the holes, couldn't get the bolts in, and called it a night at 2:30AM. I had put some 3/4" split-less loom in for the Matty thrower I rigged up too.


The next day when i got home, I quickly ground down the screws that stuck out from the Spengler hook (so that it can fit any shell, its supposed to be like that) and added some labels. I didn't have the new ones Vinny has made yet because I am on the list for the metal labels too, and I debated about leaving it without, but I had labels from Crix as well as the metal ones from Joe/Don and I decided I wanted them. I put a few on and called'r done enough for today, and went off to the event.

Image

And now a bunch of photos cause why the hell not?!

Image

Image

Image

Image

Image

Image

Not sure if you can tell, but the hammered paint really didn't do anything for the texture. I think it only shows from the original shell texture.
#4805743
NoodleMaps wrote:I had the same issues getting my ribbon cable through the shell. Was a real pain!
You're tellin me! Those GB2 cables must be really nice but you can call yourself a Real Ghostbuster until you fight with a GB1 ribbon cable! ;)
#4805759
jay very good job! do you do the work on all your buddies packs on there as well? are they on this site too?

i think your cable came out very good! the fake welds look excellent with the paint job, it looks spot on man!! very good job!

im actually sad to see the pack almost completely done. i always look forward to reading you updates, and learning your tricks of the trade

amazing job buddy

stay warm, the temperature is already changing here...
#4805761
halliwax wrote:jay very good job! do you do the work on all your buddies packs on there as well? are they on this site too?

i think your cable came out very good! the fake welds look excellent with the paint job, it looks spot on man!! very good job!

im actually sad to see the pack almost completely done. i always look forward to reading you updates, and learning your tricks of the trade

amazing job buddy

stay warm, the temperature is already changing here...
Jordin is the only one with a pack and that's from 2009-2010 era. He is going to do an overhaul soon and add electronics. Not too many of the others are on the site, they all have accounts but I'm the one here mostly. I've helped Micah, Matt, and Sean with their uniforms and probably soon with their packs. You'll see more from Micah soon, we are going to do a budget plan for his pack very soon.

Don't worry, I'm at what 20 pages I think, I still have all the electronics to do, the thrower, and weathering. There will be lots still coming up. Then either a gb2 pack or I have an idea for a custom modified pack. OR I let my bank account recover a little. ;)
#4805828
PssdffJay wrote:
halliwax wrote:jay very good job! do you do the work on all your buddies packs on there as well? are they on this site too?

i think your cable came out very good! the fake welds look excellent with the paint job, it looks spot on man!! very good job!

im actually sad to see the pack almost completely done. i always look forward to reading you updates, and learning your tricks of the trade

amazing job buddy

stay warm, the temperature is already changing here...
Jordin is the only one with a pack and that's from 2009-2010 era. He is going to do an overhaul soon and add electronics. Not too many of the others are on the site, they all have accounts but I'm the one here mostly. I've helped Micah, Matt, and Sean with their uniforms and probably soon with their packs. You'll see more from Micah soon, we are going to do a budget plan for his pack very soon.

Don't worry, I'm at what 20 pages I think, I still have all the electronics to do, the thrower, and weathering. There will be lots still coming up. Then either a gb2 pack or I have an idea for a custom modified pack. OR I let my bank account recover a little. ;)

thats great you plan on another pack!! hey out of curiosity i;ve noticed a few times in ur pictures u have a black band around ur arm across the no-ghost logo. whats that about?
#4805853
halliwax wrote:
thats great you plan on another pack!! hey out of curiosity i;ve noticed a few times in ur pictures u have a black band around ur arm across the no-ghost logo. whats that about?
I quickly sewed up a few of these for the Calgary Expo shortly after Ramis passed. Its like when police officers have a black band around their badges for a fallen brother.
#4805854
35FT_TWINKIE wrote:
Pssdffjay wrote: That's (not) a big Twinkie...
I am offended.
Me too! I thought twinkles were bigger than that!


As for the paint, I could see that now. Some places did it and some didn't. My ribbon cable clamp on the booster frame left a nice outline of itself in the paint. I figure it was because it wasn't dry enough.

Important safety tip, too much paint is too much!
#4805876
Mat wrote:In that last picture you posted, the lady in the background is either eying up your pack or that delicious looking Twinkie you're holding!
I think she was looking at my butt... ;)
#4805968
Thrower time!
Look at all these parts! I have no bloody idea what I’m doing here! Didn’t I say that when I started the pack? You will see multiples of some parts, I was collecting pieces from Eric, Franchesky, RJ, and AJ.

Image

2 different acrylic rods, left is RJ, right is franchesky. Trigger tips from the same seller. A slight difference here in length, and spacing for the frosting spaces. I don’t have a GBFans tube. Not sure which one yet. Fran’s Trigger tip holds tighter on its own whereas RJ’s is looser.

Image

TB/IB Top is RJ, bottom is Franchesky’s. I’ll be using RJ’s on this thrower, no back plate on it.

Image

Image

Rear cylinder, left Fran, rights RJ. (I’m pretty sure that is correct, I made the error of picking both up at the same time and didn’t pay attention to which one was which. On the Freeky Geeky web site, RJ says it has 2 holes for attachment, so unless he forgot to drill mine, I’m pretty sure, RJ’s on the right.)
There are some differences to these. RJ’s is longer and lighter due to the hollowed out center. See my confusion later on about mounting the gun track.

Image

Image

Image

Front cylinder, left RJ, right Fran’s. This I think is actually right. Small differences again, RJ’s slightly linger, but Fran’s is lighter with the holes drilled out. I wonder what the post office thought if they stuck that in the x-ray machine.

Image

Image

Side discs, left RJ, right Fran. The only difference is the colour of the mounting screws.

Image

Other knobs, left RJ, right Fran. Pretty similar, no hole on Fran’s front knob, and no set screw on the small knob. The knurl is a smaller pattern on Fran’s compared to RJ’s.

Image

Ok, I’m back in obsessive mode again looking at reference photos and trying to find good build threads with lots of specific details. If you have one or know one, please let me know, I’m starting to go cross eyed here. Thank goodness for my ipad so I can zoom in really close on the reference photos.
#4805971
Last night I figured I would at least pull all the parts out and do some knolling to see what I had and start assembling something.

I figured either the heat sink or the 701 Clippard would be a good start. Vinny’s thrower already had holes for the clippard, so that made that decision easy.

Image

I had to file off that little tab on the shaft of the clippard so it would fit in the hole, and I also use a round hand file to make the hole slightly bigger to allow the shaft to fit in. I removed the clippard screws and used the 10-32 slotted fillister I had picked up, (I had to buy 100 of these suckers…).

Image

I found the left hole lined up center with the hole in the clippard, so I drilled that out and tapped it.

Image

I threaded the screw in enough to hold it. The right hole was slightly too far out, so with the clippard attached, I carefully drilled out the hole, took off the clippard, and tapped it.

Image

Image

Threaded in the new filisters. You can see they are only just long enough… I’ll have to cut those down. I went off of gEkX’s list and he put them as 1 ½”. Probably why I had to special order them and buy 100. TC says his are 5/8” I believe and 10-24. Anyway, I have a few extra just in case.

Image

Image

I'm not sure if the clippard label is supposed to be up or down, I've seen both so I think it was on on both positions.
#4805975
Next the gun track. This is where I got a little confused. If you’re following this as a guide, read to the end. I don’t know what I’m doing. You have been warned…

I thought this was going to be pretty straight forward. I assembled Eric’s gun track and bracket, but I had RJ’s S hook. I had read on someone’s thread that the S hook was a little too large for Eric’s track, so I already knew I would have to either get a different one, or file it down. I decided to file it. I also used RJ’s track disc and S hook disc, because RJ’s shook disk fit better with the S hook rather than the ones that came with Eric’s track. And I used both of RJ’s just to match. That is the only reason.

Image

Image

Image

Image

Then, I found that I couldn’t tighten down the bottom plate on Vinny’s thrower, there was a gap. He had the plate and thrower both tapped. I drilled out the plate holes so that they were just big enough to fit the screws through. Problem solved.

I then attempted to figure out how to mount the gun track. I first found the center line of the bottom plate. No problem there.

Image

Image

Then I figured out the distance between the outside mounting holes on the track and marked them out evenly on the plate and center punched the holes. This is where I stopped. Thankfully!

Image

As I as looking at some reference photos, I noticed the holes were not evenly spaced out. That’s when I realized the rear cylinder had the notch on the bottom for a reason. Then I spent an hour trying to figure out the placement of the TB/IB and rear cylinder and the gun track looking at reference photos and got frustrated. I’m not sure the placement of the cylinder and TB/IB in relation to each other, and if they are tight against each other, or if there is a gap between them like I’ve seen on some reference photos, or what. I decided to pack it in for the night before I drilled something I couldn’t un-drill.
#4805993
Thanks! It's just little bits at a time. And being able to function on only a few hours of sleep a night helps too. I'm more nervous of screwing up the thrower. At least with drilling holes bad or wrong in the shell, I can fix that easy enough.

I've figure out the gun track issue. Photos shortly.
#4806000
After searching through Vin's Sony lobby reference shots, I found one that showed what I was looking for. Looked like this.

Image

I taped everything down, marked the back hole on the center line. Drilled and tapped.

Image

Then I attached the track again, marked the front hole, drilled and tapped.

Image

This hole ended up going through the edge of the inside lip on the thrower. Not sure what to do about that. I was going to use washers and nuts on these but I can't if that's in the way. It took the threads, but I don't know if it's doing anything. May need to grind it out to fit a nut there.

Image

Image
#4806002
On to the v hook.

That was pretty easy once the gun track was on. I drilled using the track as a guide, tapped with the track on and Bob's your uncle, attached!

Image

Image

The v hook isn't flush on the bottom from where the holes were drilled into it and it leaves a gap.

Image

I'm thinking I'll just grind it down so it sits flush.

A shot from inside. I have washers and nuts on the v hook screws now too, but they are slightly small for that. I may try and find longer ones if I don't have to buy a ton of them at once.

Image

I also put on the brass spacers from RJ. With the washers Vinny had supplied, the barrel was wiggly. With the spacers it is nice and tight.

Image
#4806003
Some shots so far. I took off the Clippard while I was installing the gun track.

Image

Image

Image

Image

The only thing that really bugs me is the front handle is very crooked. I haven't measured how much it's out of level, but it is rather apparent as you can see from the photos. I would still buy another aluminum thrower from Vinny, I just hope by then maybe he has perfected the handles, or gotten one of those little fancy jigs to line them up.

I am worried about installing the pop mech with the handle being crooked.
By Mat
#4806013
Running a countersink bit on your gun track should fix your v-hook gap; doesn't look like it would take much.

How tight of a fit is the front handle and how thick is the aluminum gun body? If you loosen the top screw of the handle, does it look more in line with the rear handle?
#4806030
Thanks boys!

I'll look into the counter sink option. The track already is countersunk, but maybe just not quite enough. I did try and loosen the screws on the thrower handle. I'm pretty sure it is due to the pipe that is welded to the front of the gun. Loosening did nothing. I even built up the top and top right edge (you can see it goes up and to the right prom the photos) and it still didn't change it. I did measure it and it is out of level by 1/2" over the length of the front handle.

I'm not sure if I could or would want to or would know how to bend the metal. I don't know what to do about that.
By PssdffJay
#4806031
Some more progress for tonight. I decided the heat sync would be next. First I made a paper template and marked out the holes through the paper.

Image

And apparently, I'm dumb and didn't take a picture of the template on the thrower. But basically, I placed it in position and then I taped it in place. I centre punched where I needed to drill. I did take a photo of that.

Image

Image

The heat sync is threaded for 4-40 screws and it looks to me like the hero thrower are screwed in from the inside out. The gEkX list says 5/8, but that is too long, I had some 1/2" ones (not sure where I robbed them from, I suppose I'll find out later) and using a washer and a nut, they tighten down to the exact height they need to to stick out the front. What a bitch the one is, you'll see it, its the one without a nut or washer because it is too close to the edge. I'll have to trim that one down.

Image

Image

Image

Nice and flush.

Image

Image
By PssdffJay
#4806033
Next on to the side knobs.

Vinny already had these marked out so it was pretty easy. I drilled and tapped the middle for an 8-32 screw but all I have are 1" long ones. Need to trim.

Image

Image

RJ's knobs are a 10-32. Their positioning I don't like. The first screw has an edge cut off so the top knob and thread down. When they tighten they are in the NW position on both rather than a SW and SE position. Easily fixable, just need to find a new screw and replace it. Julz used a different bottom screw on his Omni build, I need to look more into that.

Image

Image

Image

That's all for today. Tomorrow, I'll probably finish the rest of the knobs and probably the lever. Then I can scrutinize over the cylinder positions and TB/IB position for a few hours.
#4806035
Hey Jay,

Looking great so far. That front handle should bend right back, the front nub is thin material and it may have snagged at some point.

Also, you probably already know this but you'll want to sand the whole gun body with some 220 grit paper before you paint.

Lastly, I'd wrap a little bit of vinyl electrical tape (3M Super 33+ is the best) around the base of the inner barrel where it enters the front nub, that will tighten it up a lot and stop it from allowing such an extreme angle. I started wrapping the throwers for folks a little after I shipped yours, if you can't find that tape I can ship you a roll.

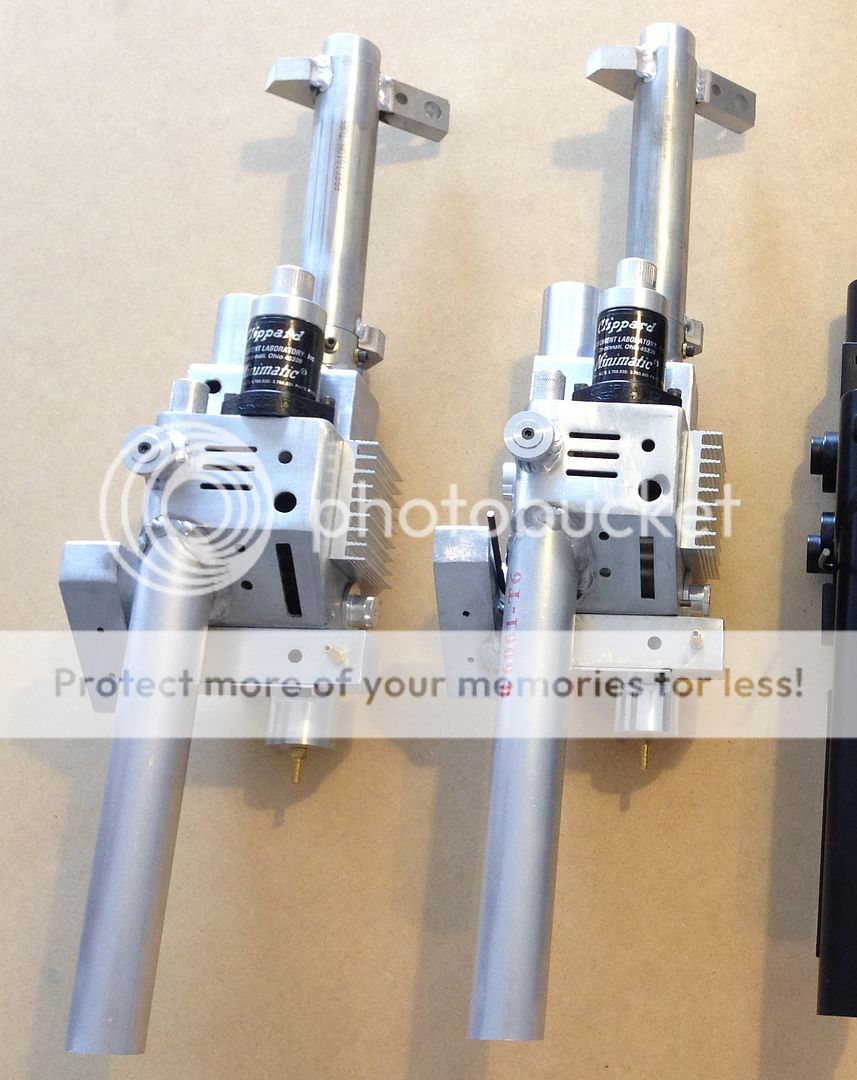
These are from the same batch of throwers after a little bit of love.

Image
PssdffJay liked this
  • 1
  • 18
  • 19
  • 20
  • 21
  • 22
  • 28

I'm not familiar with this one (is it a model?) […]

Also somewhat related question...I don't see giz[…]

Ghostbusters Day 2024

Even if Frozen Empire somehow made a billion dol[…]

To repost what I said in the other thread: I don'[…]